Saturday, December 15, 2007

Baked Pineapple Spaghetti

For whatever reason, cheesy, creamy things never attract me! Stark opposite is my dear hubby :) He ensured there was a baked vegetable in white sauce kinda dish in our wedding feast. If you've had an Indian wedding you must be aware what eating at your own wedding is like! I could *see* how good the food was, but not a morsel went down my throat! But yes I did manage to taste that creamy baked vegetable dish and in spite of all the wedding nerves I couldn't help but appreciate it :)

A few days later we went to this restaurant called "Bawarchee" in Ahmedabad. They serve some wonderful Punjabi food. Parthiv ordered this Baked Spaghetti with pineapple, and as my disposition goes, I was quite wary! No marks for guessing that it was amazing! For once I had found something creamy and cheesy that I liked :)

Once we returned to the US loaded with lots of Amul cheese we tried to reproduce our beloved pineapple spaghetti - doesn't come close to the original, but we love it anyways! (Amul is an Indian brand -read phenomenon, with a wide variety of dairy products)

Ingredients (Serves 2)
2 Cups (of cooked) Spaghetti (I also throw in some tri-color rotini sometimes)
1 cup mixed vegetables - I use peas, diced carrots, frozen corn (optional)
1 cup pineapple chunks (I use canned)
2.5 cups milk (1% reduced fat works just fine)
1 tbsp Butter/Margarine
2 tbsp all purpose flour
Salt, black pepper, sugar to taste
1/2 cup shredded white cheese (Amul cheese works the best. I use Monterey jack normally, any cheese that melts well will do)
Method
1. Cook the spaghetti with salt (per instructions on package). When half way through, add all vegetables too.
2. While spaghetti is cooking make the white sauce. Heat butter in a sauce pan. Add flour to it and saute till it turns light pink and fragrant.
3. Add milk and stir constantly. If lumps are formed, blend the mix.If you use a lot of butter the chances of lumps are lesser, but I prefer to blend the mix rather than adding more fat.
4. Simmer the sauce stirring constantly till its thick. Add some sugar, salt and black pepper. Stir and taste. The sauce should taste milky and smooth. A little sugar kicks up the flavor.
5. Drain spaghetti as soon as its cooked . Mix with the white sauce. Add pineapple chunks.

6. Now prepare a baking dish. Grease the dish and spread some grated cheese at the bottom. Now spread the spaghetti mix. Top with another layer of cheese
(you can top this with some thin pineapple and bell pepper slices - looks good and both these things bake well).

7. Preheat oven to 350 F or so. Bake for 15-20 mins. You need to bake till the cheese on top begins to turn brown. Increase oven temperature if it looks like its
gonna take forever!
8. Serve!!

We enjoy this with a bit of ketchup :) Makes a hearty meal by itself or with some bread on the side. Cooks really fast, as you can do a lot of things in parallel. Put the spaghetti on the stove, chop carrots in the meanwhile, if you have frozen corn and peas, no more work required there. You will have enough time to prepare the sauce before the spaghetti cooks. And while its baking, you can clean the kitchen and set the table :) Which makes me think I could send this over to Ruth for her Presto Pasta Nights event. It is an ongoing event at her blog with roundups every Friday! Thank you for hosting Ruth.

Friday, December 7, 2007

Parsi Dhansaak

JFI which stands for Jihva For Ingredients celebrates an ingredient every month, it is the brainchild of very talented and thoughtful Indira of Mahanandi. This time around it is being hosted by sweet and generous Linda of Out of The Garden. Every time I look at her passionately cooked Indian food I have to remind myself that this energetic lady is not an Indian! Linda chose Toor daal as the theme for JFI - December.

Toor daal is the backbone of Indian food. It is an omnipresent feature of Indian main course. This is how toor daal is normally made in Indian homes:
1. The basic cooking of this lentil requires cooking it with water and salt (and turmeric many times) till 'done'. The definition of 'done' varies. Some people like their daal to be so mushy that you can't distinguish the grain where as some people prefer it to be firmer. For the large part I think the former is more common.
2. The consistency of the daal varies again! Some people cook it to be very thick whereas in some homes its more diluted and thin.
3. The seasoning - I think daal in every home tastes different thanks to the variation in texture, consistency and mostly the tempering. Tempering/tadka/vaghar is normally prepared with hot ghee/oil, mustard/cumin seeds and asafoetida (basic ingredients), then there is no end to what you can do - use fenugreek (methi seeds), cloves, cinnamon, dry red chillies. Different combinations of fresh ingredients like - tomatoes, tamarind, lemon, green chillies, cilantro, curry leaves, ginger, garlic are quite common. Many versions of toor daal have a hint of sweetness by means of sugar or jaggery. Gujarati daal also contains cooked peanuts, which adds a wonderful flavor and fullness to the normally thin daal.

Toor daal is cooked in combination with a variety of vegetables which adds up to some great nutritive properties and makes some fantastic dishes!
1. Sambhar (that Linda *loves*) is Southern India's delightful gift to the rest of the country! It is made with a special spice mix made with common Indian spices like cumin, coriander, fenugreek etc, fresh vegetables and coconut (sometimes).
2. Daal-palak (Spinach and toor daal) is another lovely combination cooked in a thousand different ways. Silken toor daal works very well with all green leafy vegetables like fenugreek, amaranth to name a couple.
3. Dhansaak (Dhan = Daal + Saak = Vegetables)is a Parsi delicacy made with a variety of daals, vegetables and meat. It can easily be adapted into a vegetarian version. Read more about Parsi cuisine here.

I make toor daal in various ways and just love Sambhar. But I wanted to cook something different for this event and Parsi dhansaak seemed like a good choice!

I used a recipe our sweet friend N sent me and tweaked it to suit our taste and the ingredients I had on hand. If I still remember correctly her recipe was inspired by Tarla Dalal's.

Serves 4 easily
Ingredients
1/2 cup toor (arhar) dal (split pigeon peas)
1 tbsp yellow moong dal (split yellow gram)
1 tbsp masoor dal (split red lentils)
1 tbsp urad dal (split black lentils)
1-2 cups butternut squash chopped
1 tbsp fenugreek (methi) leaves, chopped
1 tomato, chopped
1 small onion, chopped
1 tsp tamarind paste (mine is quite concentrated, if making your own increase quantity to 2 tsp)
2 tsp oil
salt to taste

To be ground into a paste
1 green chilli
3 whole red chillies
2 large cloves garlic
1 stick cinnamon
4 cloves
A small piece of ginger
1 green cardamom
1 tsp coriander seeds
4 peppercorns
1/2 tsp cumin seeds
Handful of chopped coriander

Method
1. Clean and wash the dals.
2. Combine the dals and butternut squash with 3 cups of water and pressure cook for 3-4 whistles. Keep aside.
3. Heat the oil in a pan, add chopped onions and sauté till translucent. Add chopped methi and tomatoes and sauté for 2 mins.
4. Add the prepared paste and sauté for 2 minutes.
5. Add the dal and vegetables, tamarind paste and salt and simmer for 10 to 15 minutes.
6. Sprinkle a pinch of cardamom powder (the original recipe called for cinnamon, clove and cardamom powder).
7. Garnish with chopped coriander and serve with hot rice.

Dhansaak is traditionally served with brown rice. I did not have time to make it but I can imagine the combination would be wonderful. A delightful kachumbar (salad) made with finely chopped onions, tomatoes, carrots, coriander and seasoned with lime juice, red chilli powder, salt and roasted cumin powder is served as an accompaniment to dhansaak and brown rice.


I think dhansaak is supposed to be made with more vegetables - the original recipe called for potatoes, eggplants, pumpkin and bottle gourd. I just increased the amount of butternut squash. Zucchini, carrots would work well too. Spinach should be a great addition!

Also, according to the recipe - the cooked daal + vegetables were supposed to be pureed, I just couldn't get myself to do that! I'd rather overcook my daal and veggies to a mush :D

Dhansaak was bursting with flavors. Tasted better the next day! I loved it with roti too. We found the taste of garlic a little overbearing, but that is just because we don't like it much. All in all a very healthy, balanced dish with some amazing combination of flavors!

Friday, November 30, 2007

Eggless Date and Nut Cake

I always thought of dates as those yucky, sticky things young children were forced to eat in winter. I loved their dried version (known as chuara in Hindi) and my mom had to warn me against eating too many! I must've been weird! Somehow, packaged dates available in the US don't have that stickyness and I have learnt to love them :)

I would have loved to make a date relish I used to love. Its pretty simple - slice dates, add lime juice, rock salt and black pepper, shake shake, put the container out in the sun for a day. This relish is so yummy my mouth is watering as I write about it! I did not have rock salt on hand or this was definitely going to go to AFAM- Dates!

I am no baker - cook I can, bake I can't! Still I decided to make a date cake for AFAM (A Fruit A Month) - Dates from very talented Shilpa's Aayi's Recipes. Her recipe looked easy and quite doable. I had tried an eggless moist chocolate cake using her recipe, the cake had come out very good but I could smell baking soda in it, which kind of messed up the taste totally. This time instead of using the same baking soda I used 'khane ka soda/saajji na phool' that my mom-in-law brought me from India. I think they are one and the same but somehow the one I had used before was just not right!

You can check out the recipe here. I also added a handful of raisins and lots of chopped walnuts to the batter. I reduced the amount of sugar to 1/2 cup and still the cake was a tad sweeter than I would have liked. The dates I used were too sweet.

I am very impatient when it comes to cooking, when it comes to baking add anxiety to my impatience! I am almost in a 'praying' state as long as there is stuff inside the oven! More so when that 'stuff' is supposed to rise up to perfection and taste light, fluffy and moist!

I am glad to say in spite of my 'suck' level at baking the cake came out very good! It tasted great warm as well as cold. Next time I might add some cocoa powder to make a chocolate-date cake. Its a great tea-time cake and could work as a lovely dessert with ice-cream. Vanilla should be great with it (we had coconut-pineapple on hand :) ).


This Eggless Date and Nut cake is my entry to AFAM (A Fruit A Month) - Dates hosted by Chandrika of Akshayapatra.

Thursday, November 15, 2007

Daal Makhani

Updated on 11/25 for 'Think Spice - Think Ginger'

Daal makhani, better known as Kaali daal (black lentils, literally) to me has always been a favorite. It features on the menus of almost all North Indian restaurants, I think it's a place well deserved :)

This is a very simple and easy recipe for daal makhani. Does not require too many ingredients and is one of those things where you can taste every single ingredient :) I normally don't use any butter/creme to make it. I believe correctly cooking the daals is the key to its texture.

Ingredients(Serves 4):
1. 1 Cup Urad daal (whole black gram, not the split one)
2. 1/4th Cup Rajma (red kidney beans)
3. 1/4th Cup Chana daal (split bengal gram)
4. About 1 Tbsp ginger juliennes
5. 2 tomatoes chopped
7. 2-3 cloves of garlic chopped fine
6. 2 Tbsp ghee
7. 2 tsp cumin seeds
8. Red chilli powder and salt to taste
9. A few dry red chillies
10. A big pinch of asafoetida

Method:
1. Wash urad daal, chana daal and rajma well, mix them and soak overnight(about 8 hrs) in lots of water.
2. Add salt to taste and pressure cook the soaked daals. I put the cooker on high flame and after first whistle lower the flame to medium-low. Let it cook for about 5-6 more whistles. There should be enough water or the daal will burn due to the long cooking time.
3. Once the cooker cools down, mix the daals well with a ladle, urad daal should be very soft , chana daal should almost dissolve, rajma will be as it is. This is how you get the creamy consistency, long cooking time is the key. If you can see the water separated from the urad daal, you probably need to cook for one more whistle.
4. Then add ginger juliennes (more the better, but depends on your love for ginger).
5. Now for tempering/tadka - heat ghee (or butter), add hing (asafoetida), cumin, dry red chillies and chopped garlic.
6. Fry a little and then add tomatoes.
7. Once tomatoes are soft, add some red chilli powder and then add the daal. Let it simmer for a while (10 mins or so on medium heat).


If you want you can add more butter/creme at the end. Its up to you how rich you want to make it. Since my mom makes it very frequently, she doesn't add any
butter/creme. Garnish with creme/butter and fresh cilantro.

Serve with parathas/naan/jeera rice and don't forget to serve some onions soaked in lime/vinegar (and salt) on the side :) Baingan ka bharta goes hand in hand with this daal. It tastes best the next day with fresh, crisp parathas.


Thoughtful Bee of Jugalbandi suggested that I send this as an entry to Sunita's (of Sunita's World) 'Think Spice' event. The theme this month is 'Ginger', a spice I love. A ginger relish made with lemon juice, green chillies and salt used to be a regular feature on our dining table in my parents home (talented Passionate Baker made it for this event :)). Another favorite is adu-limbu nu sharbat or ginger lemonade. Parthiv and I love it during the summer! And of course cannot fail to mention the importance of ginger tea, the comfort of tea combined with therapeutic ginger fills you up with warmth and soothes sore throats. My favorite mix is grated ginger mixed with black cardmom powder, a pinch of black pepper and honey. This used to be my mom's home made remedy for sore throat and cough.

Coming back to daal-makhani, this is one of those recipes where my love for ginger is quite evident. Ginger juliennes are added raw after the daal has been pressure cooked. It brings out the flavor of the ginger and I love all the spoonfuls that have a little gingery crunch in them!


So with thanks to Bee and Sunita, this post is off to Sunita's 'Think Spice - Think Ginger' event.

Monday, November 12, 2007

Street Food (Dabeli, Ragda-Patties, Bhel-Poori) and a Meme

Street food is an integral part of the quintessential Indian life. While the variety of food varies all over the country, there are certain things that find their way in some form or the other practically everywhere. Some of the street foods that I associate with certain regions are -
- Vada pav, pav bhaji, misal pav, bhel poori, sandwiches in Maharashtra
- Sabudane ki khichdi, dahi vade, bhutte ka kees, garadu, aaloo ki kachori, matar ki kachori, samosas, patties (potato balls stuffed with coconut and raisins) etc. in M.P. especially in Indore.
- Chole-tikki, Chole-kulcha, pakodas in North India
- Daal vadas, dabeli, pizzas and sandwiches in Gujarat

Dosas, Indian-Chinese, Paani-poori are some items that feature all over the country. I remember this paani-poori I had in Shimla very well, it was special because thanks to the low Shimla temperatures the paani was very cold. It tasted just so good on a sunny afternoon!

Parthiv is a street food lover in the true sense. And this time on his birthday I decided to make just what he loves - ragda-patties, bhel-poori and dabeli. I wanted to make dahi vadas too but couldn't manage to do it in the time I had :)

Some of the ingredients needed in almost every chaat item are -
1. Green Chutney (recipe below)
2. Meethi (sweet) tamarind chutney(recipe below)
3. Jheeni sev (very fine sev - deep-fried chickpea noodles if I may). I bought it from Surati Farsaan. You can find it in almost every Indian store. This is what it looks like
4. Finely chopped onions and fresh cilantro.

Green Chutney
Grind together 2 cups of cleaned cilantro leaves, a small piece of ginger, 1 cup mint leaves (optional), 1/2 cup onions (or you can use peanuts or roasted black gram/daaliya instead), 2 green chillies, salt and lime juice to taste. Add water to get a thinner consistency.

Meethi (Sweet) Chutney
Soak 1 Cup pitted dates/pind khajur in warm water till soft. If you don't have time to soak, cook the dates in a little water in a covered sauce pan.
In a pan, add soaked dates, 2 tbsp tamarind paste and bring to a boil. Run in a blender and sieve. Add 1/2 tsp sonth (dry ginger powder), 1 tsp red chilli powder, 1 tsp salt and 1 tsp roasted and ground cumin. I normally taste the chutney to make sure its very sweet and tangy at the same time. If you feel the chutney is not sweet enough instead of soaking more dates, add jaggery to taste.

RAGDA PATTIES
Patties
Boil, peel and mash potatoes. 1 large potato will yield two small patties.
Add a handful of cooked peas and a cup of chopped spinach (optional - I add peas and spinach to reduce the guilt associated with all those potatoes :P)
Add salt and red chilli powder to taste. Shape into balls and flatten them.
Heat a non-stick tava/griddle/flat frying pan. Apply cooking oil and place the patties on the pan. Maintain a low-medium flame. Flip the patties after 5 minutes or so. Keep doing this till they turn golden and crisp on both sides.
Note: If you plan to eat the patties with just yogurt or ketchup (without any chole or ragda), add some fresh coriander, chopped green chillies and dry mango powder (amchur) to the potatoes.

100_7226

Ragda ( 1 cup dry peas serves about 4 people/8 patties)

I learnt making ragda from my mother-in-law. This recipe uses tomatoes and other spices and I just love it with patties. My friend H who is from Bombay does not use any spices in her ragda, probably just a tempering of mustrad seeds and heeng, and that is really tasty too.
Ingredients:
1. 1 Cup Dry yellow peas (vatana)
2. 1 tsp mustards seeds, a pinch of ajwain (carom seeds), a pinch of asafoetida, 2 dry red chillies, a few curry leaves.
3. 2 tomatoes pureed ( or 1 tbsp tomato paste).
4. Red chilli powder and salt to taste and a 1/4 tsp sugar.

Method:
1. Soak dry yellow peas (vatana) for about 6 hours. Do not use the dry green peas for ragda, yellow peas taste very different. Pressure cook for 3 whistles with salt to taste and a pinch of turmeric.
2. Heat oil, add all the tempering ingredients in #3. Let the mustard splutter.
3. Add pureed tomatoes and saute till tomatoes look cooked.
4. Add everything in #4 followed by cooked peas. Add water if necessary and simmer for 5 minutes. Some peas will be totally mashed by the time you are done simmering. Note: Ragda has to be thick but of a flowing consistency. It should be spicy with a touch of sweetness. You can add garam masala if you wish. I normally don't.

To serve:
Place two hot patties in a bowl, pour piping hot ragda over it. Now add 2 tsp of green chutney, about a tbsp of sweet chutney, chopped onions, cilantro and tomatoes (optional). I like to sprinkle a tiny amount of salt and red pepper after this. Top with sev. Ragda-patties is ready to eat, it is very important that it is served very hot.

I normally let the guests assemble their own ragda patties plate. I love it with a dash of beaten yogurt too.

100_7234
This picture is just to show you all everything that makes up ragda patties :) Check out the actual plate below.
100_7237

DABELI
Dabeli is a very popular street food item from Kutch region in Gujarat. I had never eaten it till I got married. Parthiv made sure I got a taste of it, but I ate it as a part of a sampler and quickly forgot what it tasted like :p My mom-in-law brought us 6 packets of dabeli msaala in her trip here and we have been putting them to good use :) I do not have a tried and tested recipe for making the masala itself, but I found one here.

Ingredients (makes 10 dabelis)
1. 10 burger buns
2. 5 large potatoes
3. 5 tbsp dabeli masala (this is for the masala I used, you would probably need to taste the masala once added to potatoes to decide on the quantity)
4. 2 tbsp oil
5. 1 cup fresh pomegranate
6. Chopped onions
7. Peanuts (I used the Planter's salted and roasted variety)
8. 1 tsp roasted cumin powder, 1 tsp red chilli powder, 1/2 tsp black pepper powder and a tsp of oil (for seasoning the peanuts).
9. Meethi chutney
10. Garlic chutney (I used Sriracha, works out well for me). If you want to make your own chutney, roast 10 garlic cloves in a little oil, grind with 20 dry red chillies, salt and lemon juice) .
11. Salt to taste

For preparing the peanuts
1. Coarsely chop the peanuts (I used my chopper).
2. Heat oil, add red chilli, black pepper and cumin powder.
3. Quickly add peanuts, mix well and let them cool.

For the filling
Heat oil in a heavy bottom pan or kadahi. Add boiled and mashed potatoes, salt and dabeli masala to taste. Mix till the mixture is uniform (I do it for about 10 minutes, brings out the flavors of the masala). Taste and add more masala if needed. You need a little muscle power here, especially if the quantity is large (the potatoes tend to stick to the pan). You can add a little water while cooking if the filling feels too dry.

Assembling the dabelis
1. Mix garlic and sweet chutneys together. Apply on the lower half of the bun.
2. Place a big helping of the filling on it. Top with the other half of the bun and roast on tava with a little butter (I like to toast the buns with the filling to make sure the filling gets warmed up).
3. Remove the top half of the bun. Sprinkle a good helping of peanuts, onions, pomegranate seeds and sev on top of the filling. Place the top half back and press a little before serving. You can add more sweet chutney if you prefer.

100_7329

Dabelis are supposed to be very spicy with the sweet chutney adding the much needed sweetness. Yumm!

100_7330


BHEL-POORI
Ingredients
1. Puffed rice/murmure. Dry roast the murmure in a heavy bottom pan if they are not crisp.
2. Sev
3. Crispy pooris/papdi (crushed), you can buy them in any Indian store or make some yourself :)
4. Fried spicy chana daal (again, bought from Surati farsaan)
4. Finely chopped onions, tomatoes, cilantro, boiled potatoes, carrots (optional), pomegranate (optional)
5. Lemon juice
6. Chaat masala (optional)
7. Green and sweet chutneys, garlic chutney (optional)

Method
This is easy :) Mix together #4 to #7. Just before serving add #1 to #3 and mix very well. Serve immediately.
100_7293

This time around, I used bhel-poori mix from Surati Farsaan :). It contains a mix of murmure, sev and papdi.

And now is the time for a meme, sweet and Talented Ms. Musical tagged me for a "Life in fours" meme :) Here we go!


Four places I've lived:
Bhopal, India
Indore, India
Arlington, Texas
San diego, California

Four jobs (Thank God!) I (never) had:
Working in a candy shop(I would've eaten them all myself!)
Working in a Dentist's Office (All Dentists out there, I respect your profession, but you scare me! Ref: Comment above :P)
A juggler! (I am so clumsy I can't even handle my cell, my car keys and my purse at the same time... add sunglasses to that and I am DONE!)
A Librarian (I would get so busy reading that I'd forget I am supposed to be on a job!)

Four favorite places I've holidayed:
Kodaikanal, India
Big island, Hawaii
Pattaya, Thailand
Kulu Manali, India

Four favorite foods:
Mom's rajma-chawal and kadhi-chawal. Also bhindi ki sabzi, arbi ki sabzi, baingan ka bharta, alu ke parathe and her ROTIS
Masala dosa and sambhar
Thai Spicy noodles
Paani-poori, chole-tikki and samosas!

Four places I would rather be:
Eating paani-pooris at a thela with my brother
Driving all over Big island with Parthiv
With my direct-dil-se group (that is what we call our group of friends from college days) at our college canteen
Golden Temple, Amritsar (this came to me thanks to Ms. Musical's mention of Amritsar in a comment she left me) :)

Four bloggers I would like to tag:
Mona of Zaiqa
Passionate Baker of Passionate About Baking
Bindiya of In Love With Food
Swapna of Swad

Please take it up if you have the time and inclination :) And please ignore if you've been tagged already!

Thursday, November 1, 2007

In Search of the Perfect Chole

I feel my search will never end. I make chole in at least 5 different ways, I keep experimenting, adding or removing ingredients, tweaking the procedure one way or another to get the taste that you get in the not-home-made chole. But the search continues. If you have ever tasted 'Havmor' (in Ahmedabad)'s chana-poori, you will know what kind of chole I am talking about. Chole in a dark thick gravy with some mysterious spices, each little chick-pea bursting with flavor to its seams. I know one thing - they use a barrel of fat in them! And I also know that I turn out to be a chicken when it comes to using a lot of oil in my cooking. Not that I don't love deep fried food - kachoris, pooris, my mom-in-law's deep fried farsaans like chakri, sev, farsi poori, peas kachoris, my mom's shakkarpaare, bread pakodas, bread rolls, samosas... bring it on! I'll never say no! :D

So, here we were, eating home-made chole, thinking about a plate of Havmor's, living in perpetual want for the perfect chole... and then we went to a pot-luck party where this lovely girl A (who I met for the first time) brought in some killer chole. It looked like the search had ended :) She sweetly sent me the recipe next day and I didn't waste a day in trying it out. The result - pretty good chole, but still in the same cadre as my other recipes. I just couldn't get mine to taste like hers! Most likely reason - my tendency for avoiding oil!! I then started tweaking her recipe and now we have moved a notch up. Our friends love those and so do we, but the search continues....

I just realized the above paragraph is good for nothing as this post is not about that recipe :D One week-night, it was pretty late by the time I got to the kitchen to cook. Saw these two chickpea cans, opened the freezer to find some frozen parathas. All set for a tasty meal! :)

My colleague Mr. K who is also an Indian (and from Delhi) knows what I mean when I say I need to get my chole right. He is a foodie like me :) He and his wife try several ways to make chole and he always brings me some to taste! A few days back he brought me a packet of 'Shaan Punjabi chole masala'. He said it’s a Pakistani brand and may be worth a shot for a different flavor. The ingredients for this brand of masala are quite different and include Baking soda and garlic. I wasn't sure if I wanted to try out the brand new masala when we were so hungry and this was the only thing I was cooking. So I decided to mix it up with other masalas. Armed with Shaan Chole masala, MDH chole masala and my home made mix of spices, and two chick pea cans I set out to make chole.

Here's the recipe-
Ingredients:
1. 2 cans chickpeas, wash and drain. Or 3 (cooked) cups kabuli chana/chole/chickpeas soaked for 6 hours and pressure cooked with salt to taste.
2. 1 Medium onion (grated or minced)
3. 1 tomato sliced lengthwise
4. 2 tsp chopped green chillies
5. 1 tbsp ginger (grated/ground into a paste)
6. 2 cloves garlic ((grated/ground into a paste)
7. 1 bay leaf
8. 1 tsp cumin (jeera) seeds
9. 0.5 Tbsp Shaan chole masala
10. 1 Tbsp MDH Chole masala
11. 0.5 Tbsp mix of roasted and ground cumin, pomegranate seeds and coriander seeds (1 part of coriander, 1 of cumin and 1/2 of pomegranate seeds - I made this masala for one of my experiments and just happened to have some left over).
12. 1 tsp red chilli powder
13. Salt to taste
14. 1 Tbsp cooking oil

Method:
Heat oil, add bay leaf, cumin, let them get fragrant and a little brown and then add green chillies-ginger-garlic. Sauté and enjoy the aroma :) Now add grated onions. Sauté for about 10 minutes on medium-low heat. If the onions stick to the pan, sprinkle few drops of water once in a while. Let the onions turn golden brown. Once you feel onions are cooked (make sure they are, half cooked onions can mess things up totally) add everything from #9 to #13. Be careful with the salt, canned chickpeas already have salt. Sauté for a minute. Turn the flame to high and add the chickpeas. Mix well to make sure the chole are coated with the masala. Now add a cup of water, bring to a boil. Add half of the sliced tomatoes, lower the heat, cover and let the chole simmer. When chole get to the desired consistency, add a few thinly sliced onions, rest of the tomatoes on top, turn off the flame and cover.

When ready to serve, mix the chole with the onions and tomatoes on top. Onions and tomatoes would have slightly cooked with the steam. Onions lend a nice aroma when you do this. Add more water if the gravy has dried out. Bring to a boil again, garnish with onions, chopped green chillies and fresh cilantro and serve with pooris/bhaturas/parathas.

100_7284


I kept tasting the chole and added masalas as I thought necessary. You can use any one of the three masalas I used or even garam masala. I think the mix of roasted and ground coriander, cumin and pomegranate seeds is the most important ingredients.

I made a quick salad to go with the chole. I had bought this bunch of different colored carrots from Whole Foods. I tasted them and was disappointed, they had no flavor, just the crunch! I assumed the dark purple carrot would be the same as 'Kaali gajar' that we used to get in India sometimes. Mom would make a Kaanji out of Kaali gajar. Its a tangy drink made with mustard, red chilli powder and these carrots. Long slices of carrots are mixed with mustard, red chilli powder, salt and lots of water. This concoction is then allowed to sit in the sun for a day or two. The result is beautiful maroon colored water with a solid tangy flavor... yummm, gotta make that someday! So back to the purple carrots - When I cut them I found only the skin was purple, I felt cheated :(( Ha ha! So after lamenting for a while, I decided to make a quick salad.

Sliced 2-3 carrots in long thin slices, did the same with 1/4th cucumber and *very* little red onions. Mixed it all with salt and lime juice to taste. Warmed 1/2 tsp oil, added 1 tsp raai ki daal (split mustard seeds) to it. Added this tempering to the salad and mixed it well. I would have loved to add slit green chillies as well, but I thought the salad might get too hot for Parthiv :)

This crunchy salad made a perfect accompaniment to the hot chole and parathas.
100_7289

If you read this, I would love to know how you make chole. So do leave me a comment! I will post the other recipe I talked about, soon :D

100_7285

Saturday, October 13, 2007

The Daal Baati Party!

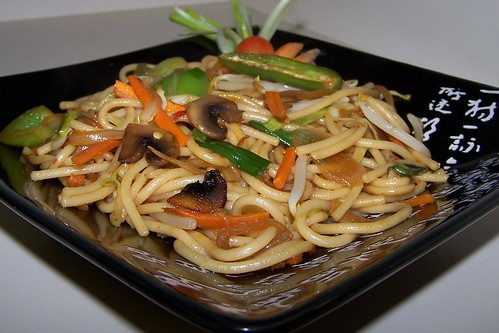
Daal-baati is a staple food item in Rajasthani cuisine. You can also find it featuring in various restaurants and homes in the 'Malwa' region of Madhya Pradesh.

Baatis are small balls of wonder soaked in enormous amount of ghee (clarified butter). If you don't like ghee, baati is not for you! Baati is largely made of wheat flour with addition of another flour in a smaller amount. I have seen them being made with makai (maize) and besan (chickpea) flour. Baatis are normally eaten with daal, where daal preparations vary in every household. Some people make it with panchkuti daal (a mix of 5 lentils), some with a mix of split urad (split black gram) and chana daal (split Bengal gram), some with a mix of tuar (split pigeon pea) and chana daal and many times, with just tuar daal. Similarly, the seasoning varies from a plain tadka (tempering) of ghee, heeng (asafoetida), jeera (cumin) and red chilli powder to a more complex one of the former plus onions, green chillies, tomatoes, garlic, ginger etc.

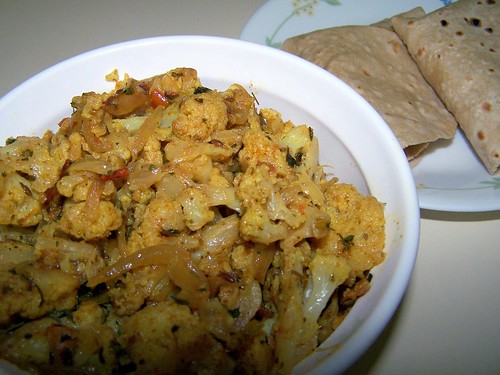
Accompanying daal baati is normally a dry side. Again numerous possibilities here. But in the various places I have eaten daal-baati, the vegetables used are either potatoes or eggplants or a combination of both. Most common in the marwari households in Indore is sookhe aaloo (potato chunks seasoned with dry spices). Then comes baingan ka bharta (made with fire roasted eggplants). another common side is aloo-baingan ki sabzi (potatoes and eggplants cooked with tomatoes and other spices). A new side that I tried very recently is aloo ka bharta (Indian mashed potatoes if I may).

And then there has to be a platter of pickles and chutneys. Most common being mango or green chilli pickles. Chutneys are normally green chutneys made with cilantro and raw mangoes or lemon juice. The other variety is the fiery garlic and red chillies chutney.

The right way to eat daal baati is using your hands. You are supposed to mash the baati, pour daal over it, add a stream of warm ghee, mix it all and eat with some chutney/pickle and the side sabzi in every morsel.

Now comes my experiences with daal-baati :) We never made it at home! It would be a popular picnic item when cooking was done at the picnic spot. Either a cook who accompanied us or a handful of ladies (and some gentlemen) who were baati experts would be busy preparing the lunch treat. I have clear memories of one such picnic on a field in a small village close to Bhopal. I was a kid at that time and wouldn't have cared less what was for lunch, leave alone how they were making it! So I don't know how they did it without any conveniences of a cozy kitchen!

The next time I had baati after many years was at my dearest friend N's house. Her mom made amazing daal baati, which was always served with oodles of ghee and tons of love. And all the while I was in Indore, she would call me every time she made it :) Those were the days!

And then someone told my dad about a restaurant located in the Cloth Market in Indore. It was called Prithvilok. Now let me tell you what Cloth Market looked like. Cloth market (or Kapda Bazaar) was located in the heart of Indore, a city that was once known for its cloth mills. So it is not hard to imagine the huge trading community in Cloth Market, especially whole-sale. Cloth Market is *always* full of people. To accommodate the cloth merchants who come from all over the country to buy and sell cloth, there were a number of dharamshalas/lodges/hotels in close vicinity. One such lodge was Prithvilok and no marks for guessing that they served food too. The first time we went there was on Sunday afternoon (Cloth Market shops used to be closed on Sunday). We met with a plain facade of a lodge and a long flight of stairs. As we walked up the stairs we saw dormitory like rooms with a good number of beds and people sitting there chatting or lying down. As we went up to the next floor we saw a little lobby leading to the restaurant. And there were rooms at the other end of the lobby. Probably enough to drive people away! But the fact that we were brought there by my father's colleague Mr. A and his insistence on the good quality of the food kept us going. Once we entered the restaurant we were in for a surprise! The restaurant looked nice and new and clean and actually tastefully decorated. Mr. A informed us that it has been renovated over the years. Good :) Now coming to the food, the treat would start with a glass of aam ka panna ( a sweet and tangy raw mango drink) or chach (salted buttermilk) and then followed up with a huge metal thali that a stream of servers would fill even before you could say Thali! There was daal, kadhi, 3-4 vegetables, papads, chutneys, pickles, salads... the usual Indian thali fare. But the fun started when they started bringing in these heavy weight baatis saturated with ghee. These people could continue feeding you forever and ever if you didn't say no! We would always come back with Prithvilok full enough to be sick! :) But it was one amazing place! I don't know if I will even get a chance to visit again. I could still go on about it and this post is already getting way out of limits and I still haven't talked about our own daal-baati party!

So with all those baati experiences it’s not hard to crave for this delicious treat. The first time I had baati in the US was when N visited me in Texas and made her mom proud by making baati for me :) And she did make her mom proud, practically mummy ka naam roshan kiya :) The baatis were so so good, thank you sweetie-pie :)

And then another time was when our marwari friend B treated us to this most amazing daal baati ever! Her recipe was so different, the baatis had a stuffing and the daal was made with split urad. We did not need any sides or any chutneys to go with it! It was just so good!

Several times we have talked about making daal-baati with our friend V (who also happens to be my ex class-mate from Indore). So one Sunday morning (after several failed plans to meet up and make daal-baati), V called his mom in India to get baati recipe. An hour or so later he arrived, armed with the recipe, 2 big eggplants for baingan ka bharta and a jar of ghee :) We set out to make, baatis, daal, baingan ka and aloo ka bharta.
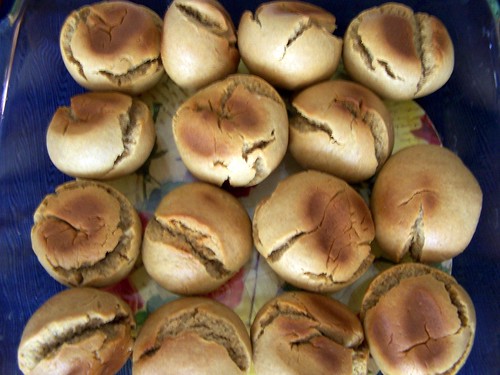
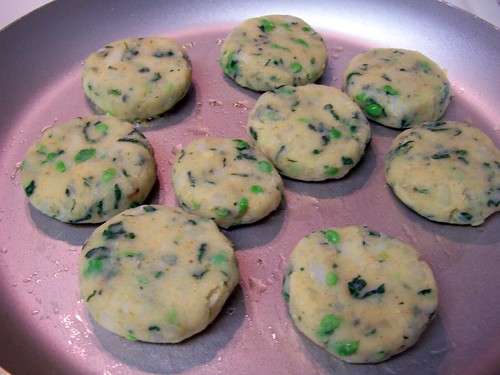
THE BAATIS
Ingredients (for about 15 baatis)-
1. 3 cups whole wheat flour.
2. 1.5 cup chickpea flour (besan).
3. 8 tbsp or so of clarified butter (ghee).
4. Salt to taste.
5. 1.5 tsp baking soda.
6. water to knead.

Method -
Sieve everything except ghee together. Add ghee to the flour gradually, rubbing with your hand. Once all the ghee is mixed, gradually add water and knead as you would do for rotis. The dough has to be firmer than that of roti, more like parathas I would say. The ghee measurement I have given here is approximate. The point is to have enough ghee (yes you have to be a braveheart!) to make a smooth dough. Set the dough aside for 15-30 minutes and then form small golf sized balls with it. Sweet R did this for us, every baati was exactly the same size! :) This being our first attempt at baati, we did not dare try bigger baatis. We were worried they might stay uncooked at the core.

Now preheat your oven to 300 deg F. Grease a baking sheet and place the baatis over it. Bake for about 10-15 minutes (again approximate) I didn't look for the time as I was busy doing other things meanwhile. Sorry! When they start looking cooked, turn them over and bake for another 10-15 minutes. Keep checking back (since I was stupid enough to not note the baking time!) :D
Our baatis cracked on the top! I don't know why, may be my dough did not have enough water! But they tasted great anyways so we didn't mind. When the baatis are done, heat ghee in a sauce pan and dip each baati in it. I remember B had deep fried the baatis in hot ghee before serving.
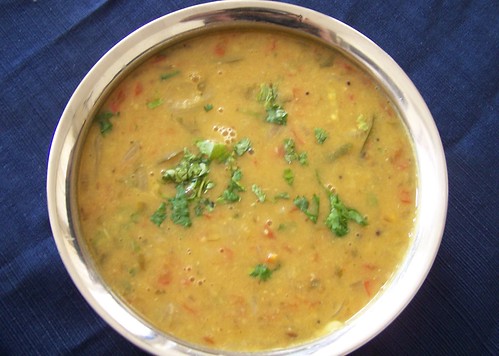
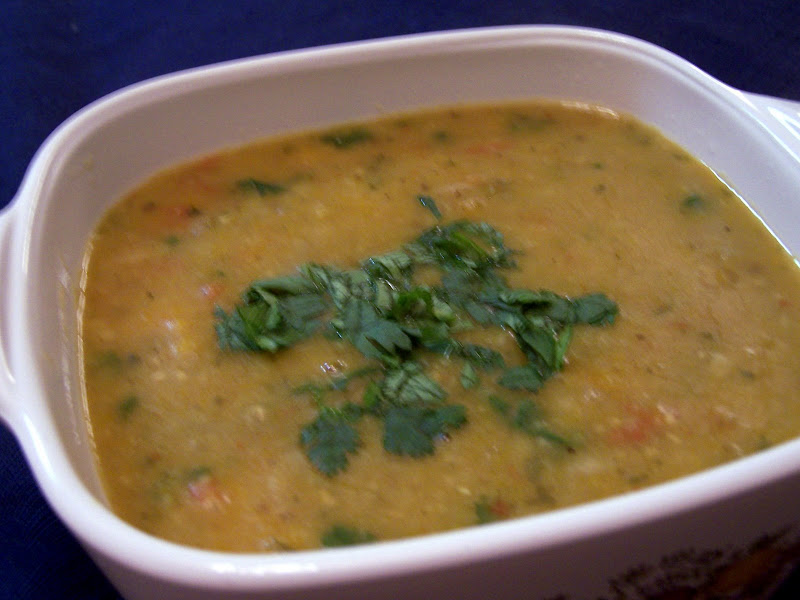
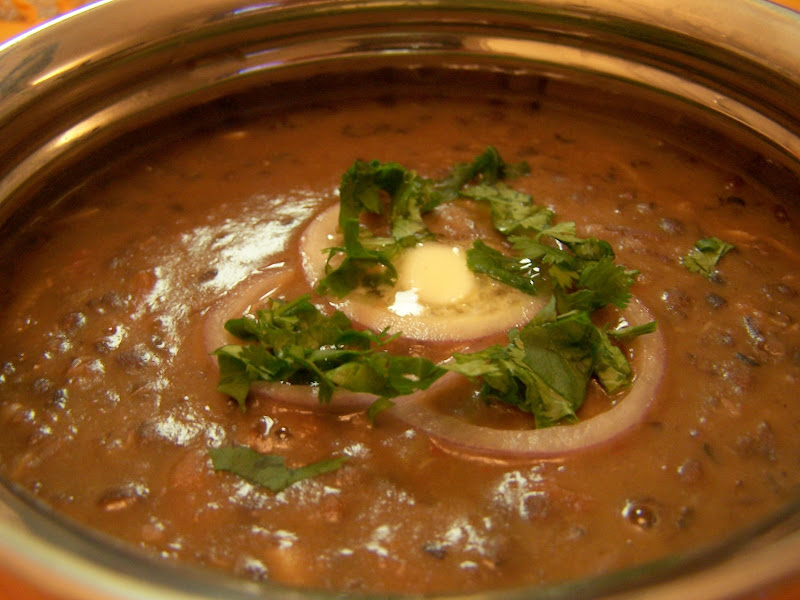
100_7180

DAAL
Daal this time for us was made with an interesting mix. R had some mixed urad-tuar left over from dinner last night and I had some tuar daal in my freezer. So here's what we did.

1. Heat ghee, add mustard and cumin seeds followed by heeng and curry leaves.
2. Add grated ginger and chopped onions. Sauté till onions are soft.
3. Add chopped tomatoes and slit green chillies and cook till tomatoes are soft and blend with the onions.
4. Now add red chilli powder and turmeric.
5. Add R's (already very tasty) and my thawed tuar daal. Add salt if needed and simmer for 10 minutes.
6. Add fresh cilantro when done.

You can use any combination of daals with this tadka. Most common combos are chana and tuar and chana-urad-tuar.
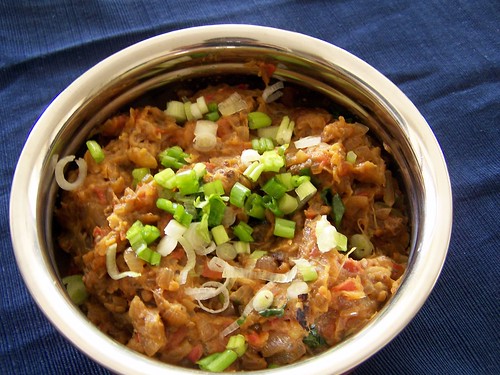
100_7165

BAINGAN KA BHARTA
Ingredients (serves 4):
1. 2 large eggplants (the roasting variety)
2. 1 cup chopped onions.
3. 1 cup chopped tomatoes.
4. 2 chopped green chillies.
5. Oil to cook
6. salt and red chilli powder to taste.

Method:
1. Roast the eggplants. You can do this in your oven or on the stove top. I placed a perforated grill plate on the stove (at medium heat) and placed the eggplants over it. As the skin begins to char, keep rotating the eggplants to cook uniformly. This will take about 20 minutes (more in the oven, but oven is less messy and roasting is more uniform. Make sure all doors and windows are open or your home will smell like a roasted eggplant for 3 days! Lighting a candle helps :)
2. When eggplants are thoroughly cooked (insert a knife and make sure it goes all the way in easily), immerse them in cold water.
3. Ad they cool down, remove the skin with your hands and give a quick wash to the eggplant insides. mash into a pulp.
4. Heat oil (about 1.5 tbsp), add onions and sauté. After 2 minutes or so add tomatoes and green chillies. Again sauté for 2 minutes.
5. Now add the eggplant pulp, red chilli powder and salt. Mix well and suate for 5 minutes.
6. Let the bharta cook till oil separates (my oil never separated! although I did put in a lot of it!)
7. Add chopped spring onions/cilantro or both for garnishing.

You can always add garlic or other spices of your choice. I just did what my mom does :) and I just love her bharta . You can also add green peas with the eggplant pulp. I didn't do it this time, I had a feeling peas will break the smooth texture of the bharta needed to go with the baatis.
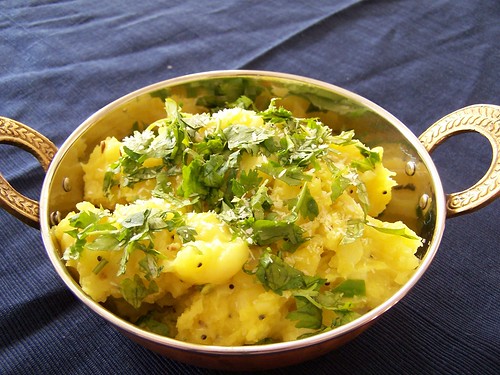
100_7168

ALOO KA BHARTA
(serves 4)
1. Boil and peel 4 medium potatoes.
2. Add salt to taste and mash.
3. Heat 1 tbsp oil, add mustard seeds and 2 finely chopped green chillies.
5. As mustard begins to splutter, add heeng and curry leaves.
6. Turn off the flame, wait for a minute and then add 1/4 tsp of turmeric powder.
7. Add this tempering to the mashed potatoes and mix well. I heated the potatoes while mixing the tempering.
8. Turn off the heat and add lemon juice to taste.
9. Garnish with cilantro and desiccated coconut (R's idea :))

100_7179

LAHSUN KI CHUTNEY (Garlic chutney)
1. We used maharashtrian peanut chutney as base for this chutney.
2. Heat oil, add 4-5 roughly chopped cloves of garlic and let them turn golden. Add 2 dry red whole chillies. Mix in the peanut chutney.
3. let cool and grind to a fine paste with salt and a little lime juice.

If you don't have peanut chutney handy, use roasted peanuts, cumin seeds and increase the amount of red chillies.

I think that is it!

We then spread out a table cloth on the floor. We had to eat our baatis right! Where sitting on the floor, cross-legged and eating with our hands is the RIGHT way :)

100_7183

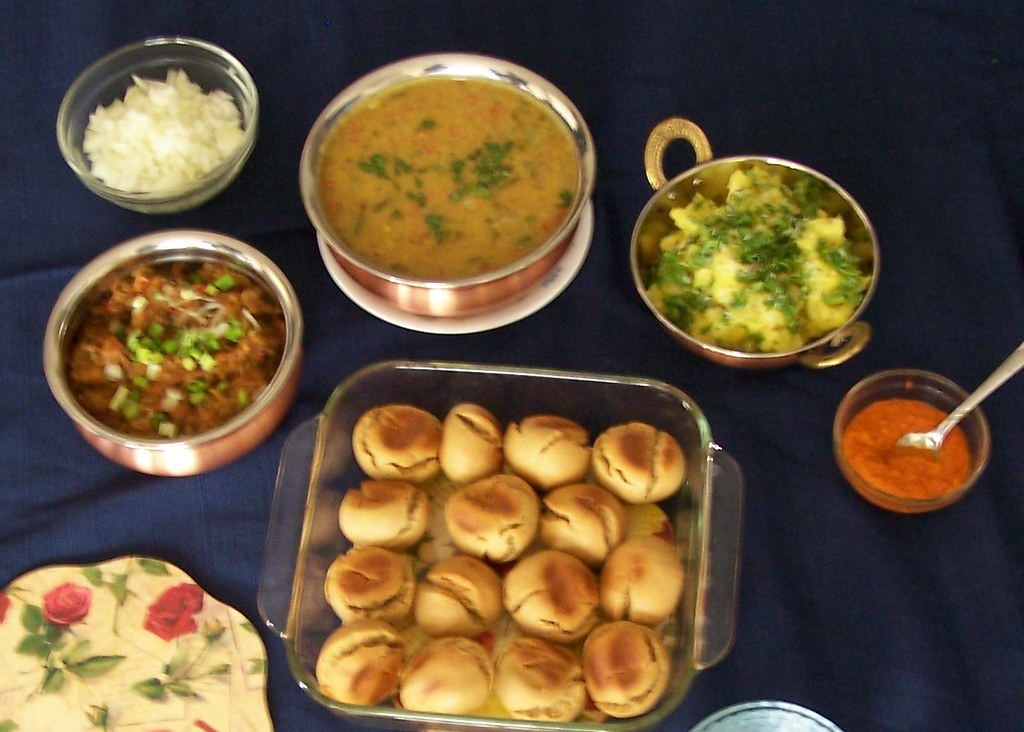
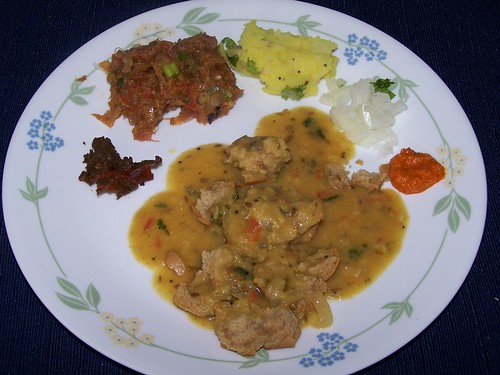
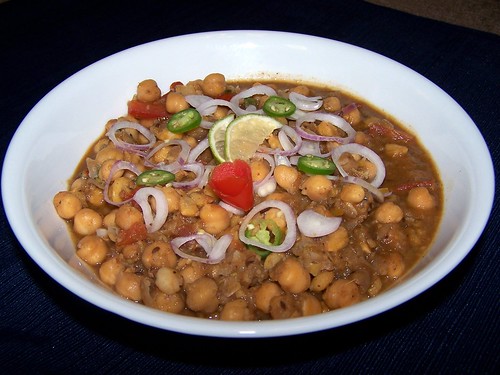
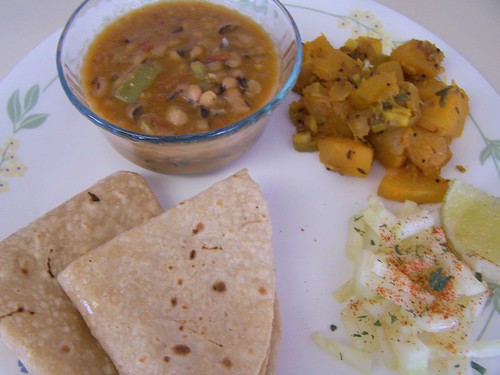
This is what my plate looked like (Clockwise - red chilli pickle, baingan bharta, aloo ka bharta, chopped onions, lahsun ki chutney and crushed baati topped with daal). We refrained from adding extra ghee but that would be the right RIGHT way to eat your baatis :)
100_7186

Friday, October 5, 2007

Methi wala kaddu and tari wali barbati

I am pleased with the title of this post, both 'kaddu' and 'barbati' are words that I don't get to hear very often nowadays :) Just another wave of nostalgia I guess! :)

I have been eyeing pretty looking Banana Squash at the grocery store for quite a while now but never tried cooking it. The other day I suddenly remembered the 'methi wala kaddu' (Indian Pumpkin seasoned with fenugreek seeds. Where Indian pumpkin is something close to butternut squash) that my mom used to make. And it felt like I had found some use for the banana squash :) Here's her recipe -

Ingredients: I am not giving exact measurements as this preparation doesn't need any!
1. Banana squash peeled and cubed. It was quite easy to peel using a regular peeler.
2. A little oil to cook.
3. Chopped green chillies, onions and garlic
4. Lemon juice
5. 1/2 tsp fenugreek seeds, 1/2 tsp mustard seeds, 1 tsp cumin seeds. (In other words, use less fenugreek and mustard, and more cumin :))
6. Red chilli powder, turmeric and salt to taste
7. Fresh cilantro -chopped. I didn't have it, so I used spring onions.

Method:
1. Heat oil, add all the seeds and let them splutter.
2. Add garlic, followed by green chillies and onions. Saute a little bit. Don't let them brown.
3. Add chilli powder and turmeric, saute.
4. Mix banana squash cubes, sprinkle salt to taste and mix well.
5. Add a tbsp of water, mix, cover and cook for 5-7 minutes on medium heat.
6. When the squash is cooked, turn off the heat and stir in cilantro (I used spring onions) and lemon juice to taste.
7. Cover and let the flavors sink in.
8. Serve with fulkas/paratha and a wedge of lime.

Actually the spring onions went quite well with the other flavors. I might add it the next time, even if I have fresh cilantro. Mind you, the dish has a slightly bitter taste because of the fenugreek seeds, but I think that is what makes this preparation special! :)

I served it as a side to tari wale barbati/lobia/rongi/rawan/chowli/black-eyed peas :)

100_7210

This is how I made the barbati.
Ingredients (serves 2)
1. 1/2 cup black-eyed peas
2. 1/2 onion grated/chopped fine
3. 2 tomatoes pureed
4. 2 tsp ginger/garlic/green chilli paste
5. Masala - 1 tsp red chilli powder, 1/2 tsp turmeric powder, 1 tsp coriander powder
6. Oil about 1/2 tbsp

Method:

1. Soak black-eyed peas for about 2 hours in cold water. Pressure cook for 3 whistles with a little salt and enough water to immerse the beans. I prefer not to cook the beans too much initially as they should retain their shape.

2. Heat oil, add onions, ginger-garlic-chilli paste and tomatoes. (I put them all in the chopper together and chopped fine. My mom grinds them all - I am not fortunate enough to have an Indian blender like she has :) Turns out to be pretty quick and doesn't seem to matter though!)

3. After about 5-7 minutes of sauteeing as oil begins to separate, add all the masalas and a little salt. At this step I also added some chopped green bell-peppers, a lovely tip from dear Musical of Musical's Kitchen. Saute for a minute.

4. Add cooked black-eyed peas with the water it was pressure cooked in. Simmer for about 10 more minutes till you get desired consistency of the gravy.

5. Add fresh coriander.

Alternatively, you can also avoid pre-cooking the black-eyed peas. Just prepare the masala as in step 2 and 3, in step 4 add soaked black-eyed peas and then pressure cook for 4 whistles. I didn't do it this way this time around as I didn't want my bell peppers to over cook :)

For the extra dash of flavor, you can sprinkle some garam masala or chana masala at the end.

This meal was very close to a typical sunday meal at my parent's home. The only thing missing was chaach or namkeen lassi as punjus call it :) We would *always* have salad at home, so I made sure I at least had some chopped cucumber with this meal :)


100_7208

Sunday, September 30, 2007

Paneer 50-50

Parthiv loves paneer. He makes awesome paneer tikkas and the likes, so when he says he is going to dish out something with paneer, I never think twice and assist him happily :)

The other day, we wanted to make something easy and simple. I thought of kadhai paneer (a little on the dry side with chopped onions/tomatoes etc). But he was more in the mood for the matar-paneer kind (made with onion/tomato paste). So he declared he'll make me happy and make 50-50 paneer. Here's how he made it.

Ingredients:
1. About 2 cups paneer - thawed to room temperature and cubed. We used frozen paneer bought from an Indian store ("Nanak" brand).
2. 1/2 cup green peas
3. 1 onion (medium-large). Chop half of it it very fine in a chopper and slice the other half lengthwise.
4. 2-3 tomatoes made into a paste (we put the onions and tomatoes in the chopper together, so they were chopped very fine). 1 tomato, sliced lengthwise.
5. 1 tsp grated ginger
3. Half a green bellpepper, sliced thin lengthwise.
4. Red chilli, turmeric, coriander powder and salt to taste.
5. 2 tblsp of milk (use fat free if you like, worked for us).
6. 1.5 tbsp cooking oil.

Method:
1. Heat half the oil in a non-stick pan, as it heats add ginger followed by finely chopped onions and tomatoes. Saute till oil separates, should take 7-10 minutes on medium flame. You may need to add a little more oil to actually see the oil separating :) If you don't want to use too much oil, just ensure that the color gets darker (you may have to keep sprinkling water once in a while to make sure the paste doesn't burn). We added peas also somewhere in between to make sure they get cooked (when to add them will depend on how long it normally takes your peas to cook).
2. In the meanwhile, in a frying pan heat the remaining oil. Add sliced onions and saute, followed by tomatoes and bellpeppers and a little salt. The onions should become translucent but should not cook too much.
3. Add paneer and toss on high flame. Doing this pan-fries the paneer, making it crispier on the outside and eliminating the need for any deep frying.
4. If your tomato/onion paste is done by now, add red chilli, turmeric and coriander powder and salt and saute for a few seconds.
5. Add the sliced-sauteed veggies with paneer to this and mix well, so that the masala coats the paneer.
6. Add half a cup of water and let it simmer for 5 minutes or so, water will almost dry out.
7. When almost done, add milk and let cook for a minute or two.
8. Sprinkle fresh cilantro and serve with hot thick rotis.

100_7201

As easy as that! :) To increase the flavor, you can sprinkle some kasuri methi at the end. Or if you want it spicier you can sprinkle some garam masala.

We turned up cooking our sliced veggies more than we would have liked, but it was delicious anyways :)

100_7198

The leftovers had soaked the gravy completely making it a great candidate for kati rolls (there wasn't much left though!). While packing for lunch, I added some sliced onions and lemon juice to it. At lunchtime, I heated a roti and wrapped warm sabzi in it to make a quick, tasty kati roll!

Saturday, September 29, 2007

Sooji Rotti

Our breakfast during the week is normally cereal or oatmeal (for me occasionally). But during the weekend we like to start the day with a brunch that keeps us going till dinner. I like to keep trying different things as it's so easy to get bored! The two staple Indian breakfast items poha or upma don't show up in my kitchen that often. For the simple fact that hubby dear is not fond of pohe and upma doesn't make me happy! Having grown up in the state of Madhya Pradesh, I have my share of affinity towards pohe for breakfast. I think I can eat it every single day of the week :)

So, back to trying different things - I stumbled across rice rotti on a blog (can't remember which one now!) and tried making it. It came out pretty tasty and I knew I will be making it again. My only complaint - it was not as soft as I would have liked. Very likely due to something I did wrong!

Last Saturday, when I was once again out of ideas for breakfast I turned to my blogroll for help :) And found Rava rotti in Latha's Masala Magic. I had found my Saturday brunch :)!

Here's how I made it -

Ingredients:
1 cup rava/cream of wheat/semolina/sooji
1/2 cup rice flour
1/2 cup chopped onions, grated carrots, chopped cilantro
1 green chilli chopped fine
1 tsp grated ginger
Salt to taste
mustard seeds, heeng, curry leaves, oil to season

Method:
Spread sooji on a plate and microwave for 2 mins. After it cools down, add the rest of the ingredients except the seasoning and mix well. Now you can add enough water to either make a pancake like batter or a loose dough. I have tried both ways and I found the former easier to work with. season with mustard seeds, curry leaves and heeng spluttered in a tsp of hot oil. Mix well.

Heat a non-stick pan and apply a few drops of oil. If using pancake like mix, spread like you would make a pancake. Add a few drops of oil and cover with a lid. After a couple of minutes, flip and cover. Cook for 1 minute and then remove the cover. Roast till crisp and golden.

If you use a loose dough - Make a small ball of the dough and place it on cool tava/pan. Use your fingers to pat the ball till it becomes thin. Follow the same steps hereafter. (Check out pictures on Latha's post)

Serve with butter and pickle/ketchup/tomato chutney/green chutney.

100_7158

Parthiv loved this rotti so much that he said he could have it for breakfast again on Sunday and would love it if I made it for dinner too! He said it's an "addictive" taste and my friends I have to agree!! It was soft on the inside, crisp on the outside and a little touch of butter made it just so awesome. Thanks to Latha and to Supriya of Monsoon Spice (that's where Latha got the inspiration to make this!) :)

Thursday, September 27, 2007

Kasuri Gobhi

I tried this recipe from Bawarchi Contributions once at Parthiv's birthday party and people loved it. Thanks to the contributor Mansi! I make it every once in while just for a change of taste from good 'ol alu-gobhi made Punjabi style or flower-vatana nu shaak made gujarati style.

Ingredients:
1. 1 medium cauliflower cut into medium size florets
2. 2 small potatoes diced (optional)
3. 1 small onion, chopped
4. 1 medium tomato, chopped
5. 1-2 cloves of garlic, minced
6. 2 tsp ginger, grated
7. 1 green chilli, chopped fine
8. 1/2 cup yogurt
9. 1 tsp each of red chilli powder, turmeric powder
10. 2 tsp of coriander powder (or dhana-jeeru)
11. 1 tbsp kasuri methi (dried fenugreek leaves)
12. 1 tbsp oil
13. Salt to taste

Method:
1. Add cauliflower to boiling hot water and let cook till tender (but not completely cooked). Drain to remove water completely. Alternatively, you can cook the cauliflower in a tbsp of oil. Heat oil, add cauliflower, mix, cover and cook on low heat. The second option is tastier, but if you are counting your calorie intake, first option is better.
2. If using potatoes, cook them with a small amount of oil as explained for cauliflower in step 1. 3. While the vegetables are cooking prepare the masala. Heat oil, add ginger, garlic and green chillies.
4. As they get fragrant, add chopped onions and saute till onions are soft and golden.
5. Add chopped tomatoes and saute till tomatoes are soft and cooked well.
6. Add salt, chilli powder, turmeric and coriander powder and mix well.
7. Add yogurt and stir to make sure everything mixes well together. Simmer for 3-4 minutes to make sure yogurt is cooked.
8. Add cauliflower and potatoes, mix well and cover.
9. Sprinkle kasuri methi and mix.
10. Cook for about 5 minutes on high flame without cover.
11. Garnish with fresh cilantro and serve with hot rotis or parathas and tadka daal.

100_7110

You can vary the amount of kasuri methi according to your taste and potency of the leaves. If you prefer the preparation to just have a touch of fragrant methi, reduce qty to half a tbsp.

Tuesday, September 25, 2007

Drunken(?) Chinese(?) Spaghetti and Hot n Sour soup

Like a true Hindustani, I have my share of cravings for 'Indian-Chinese' food. It is amazing how Indianized (read un-Chinese) our Chinese food is :) Well, that's not true... we use soy sauce like the Chinese, we stir-fry like the Chinese... so what if our version is spicier with a kick in each bite and so what if Chinese food in Indore has a distinct taste of Marwari cuisine? :)

So this one day I knew I wanted to eat noodles, the 'Chinese' type! To begin with I didn't have noodles at home. Hubby dear suggested using spaghetti and I made a sorry face. I thought - spaghetti would never fit in, its too fat, its too firm and its too coarse! I then remembered this 'Drunken Spaghetti' I had in a Thai restaurant and thought, lets make it Thai rather than Chinese. I googled for drunken noodles and got back hundreds of recipes. By the way, Wikipedia says the source of the name drunken noodles is unknown.
"No one is sure where the name of this dish comes from. Some believe it is called drunken noodles because it's an excellent hangover cure. Others believe that it is so hot that the eater has to be drunk to be able to stand it, while some are sure that it's because one becomes drunk trying to drown out the heat with alcohol. Still others believe that the name comes from the wide assortment of ingredients the dish contains: The chef is drunk enough to throw in a bunch of vegetables and spices without thinking it over. The most probable explanation is that this is one of the only foods available on the streets of Thailand late at night and in the very early morning, the times when inebriated revelers are leaving places of celebration. It is very possible that the extremely "wobbly" noodles themselves give the dish its name."


All of them called for some ingredient or the other that I did not have. So I gave up on the Thai version and decided - Drunken 'Chinese' spaghetti it will be! Forgive me my Thai and Chinese (and Italian) readers!!

Here's how I made it -

Ingredients
1. Spaghetti - equivalent of 2 cups cooked. I am terrible at measuring it!
2. 2 cups of chopped vegetables - onions, carrots, mushrooms, green bell peppers, spring onions and a little cabbage. And a slit green chilli (serrano/ any fat chilli).
3. 1/2 cup bean sprouts.
4. 2-3 cloves of garlic - minced.
5. 3 tbsp of soy sauce mixed with 1 tbsp of Sambal Oelek or any chilli sauce that you like.
6. Salt to taste, a tsp of black pepper and 1/2 tsp sugar mixed together.
7. 1 tsp white vinegar.
8. 1 tbsp oil to cook.


Method:
1. Boil spaghetti with a little salt. Wash in cold water and drain long enough to get rid of all the water. Toss the spaghetti with a tsp of oil to avoid sticking.
2. Heat 1 tbsp oil in a wok (I use a frying pan that gets really hot, I am still to buy a 'good' wok). As the oil gets hot add minced garlic. Add the soy sauce mix and spread it. Now sprinkle the salt-pepper-sugar mix to cover the bottom of the pan. As it begins to sizzle, add onions, slit chilli and carrots. After 30 secs of sauteing, add mushrooms - 30 secs more and add green bell-peppers and cabbage. I don't like to cook the bell-peppers and cabbage much.
9. Saute everything well and add cooked spaghetti. Toss on high heat till everything comes together.
10. Add spring onions (greens, whites, everything) and vinegar and toss again!

100_7123

For the 'Chinese' Hot n Sour soup -
Ingredients:

1. 1 cup finely chopped cabbage
2. 1/2 cup finely chopped/grated carrots
3. 1 tbsp chopped green bell peppers
4. 2 tbsp tomato ketchup (alternatively puree tomatoes - pressure cook 3 tomatoes with a cup of water, blend and strain to get rid of the seeds and skin.)
5. 1/2 tbsp soy sauce
6. 2 tsp Sriracha chilli sauce or any chilli sauce with a hint of garlic
7. 2 tbsp cornflour/corn starch
8. salt to taste
9. 1 tsp oil

Method:

Heat 1 tsp oil, add all the veggies and about 4 cups of water. If using tomato puree, add it now. If using ketchup, add it later. Add salt and let the soup boil till veggies are cooked. It should take around 10 minutes of boiling. Add soy sauce, chilli sauce and ketchup (you don't need ketchup if you added pureed tomatoes already). Simmer some more. Mix cornflour in 1/4th cup water and mix in the soup, stirring constantly. Add chopped green onions and simmer for a few more minutes. Turn off the heat and stir in 1 tsp of vinegar. Serve hot!

100_7134

We enjoyed my drunken version of Chinese spaghetti with the hot soup and pomegranate-hibiscus iced green-tea. :) I will get to try the Thai recipe as soon as I get all the required ingredients - noodles for a start!

100_7127

Saturday, September 22, 2007

Okra Gojju with Curd rice

I was blessed with two kannadiga room-mates for a while, thats when I understood the subtleties of varieties of rasam and those flavor-explosions called gojjus. So when I read about RCI karnataka, the first thing that came to my mind was gojju!

As students in Texas, we did not get a chance to visit Indian grocery stores very often and thus typical Indian vegetables did not make it to the table much. This one time when we brought some fresh okra, my sweet room-mate Roopa decided to make some bendekay gojju out of it. I loved it! It was a totally new flavor for me and a taste that I would remember forever :) So, when I decided to make okra gojju for Asha's RCI karnataka, I turned to Roopa once again. And she did send me a detailed recipe. Roopa asked me to use the measurements as a guideline and not to follow strictly. I pretty much stuck to the measurements she had given me :) I will copy-paste the recipe here as is-

"Bhindi/pumpkin gojju :
bhindi cut like that for sabji and pumpkin, cut small and long. approx 1lb.
heat up few spoons of oil (more for bhindi), splutter some mustard, add a tablespoon of urad dal and chana dal. fry till golden.
split a couple of green chillies and add (you will add more red chilli kind of spice later, this is mostly for flavor).
add the cut and washed veggie and cook till almost done or till the sticky stuff is gone.
while this is cooking roast 1 table spoon of white sesame seeds in a hot dry pan till they start to splutter. make a dry powder of it afterwards.
now to the cooked veggies add some :
water - lets say half a cup,
sambar/rasam powder -about 1 tablespoon (or gojju powder, but I use this now till my mom gets me more !),
turmeric - a pinch,
salt to taste,
and jaggery - a 1" cube kinda piece (it has to be sweet)
tamarind paste- about one teaspoon (and sour :) )
and add the sesame powder.
and now boil it till it completely cooks ! goes great with rice or chapathis ...best with curd rice ;)"


I closed my eyes and followed her recipe :) I did not have fresh okra so I used the frozen version. I had to add a good amount of oil to make sure the okra didn't turn out sticky. I heated some oil, added mustard and the lentils and added the okra straight out of the freezer without thawing. Thawing makes it real sticky! Rest of the steps were exactly the same. I did not have any home-made rasam/sambar powder, so I used store-bought 'Badshah' sambar masala.

The gojju turned out real tasty. I still think the one that Roopa had made was better! :) Using frozen okra and store -bought sambhar masala could not match the 'real' thing. But nevertheless it was quite close and very very satisfying.

100_7142

I made simple curd rice to go with it. Cannot vouch for the authenticity :)
1. Cook rice and let it cool. Mix some curd, chopped cilantro and salt with the rice. Curd should be enough to make the rice thoroughly wet.
2. Heat a little oil, add mustard seeds, chopped green chillies, heeng and a dry red chilli. Add this to the curd rice and mix well.

100_7140

Okra gojju with curd rice is my entry for RCI Karnataka, hosted by Asha of Foodie's Hope.

rciK

Monday, September 17, 2007

Tomato Chutney

I am very fond of this chutney. Parthiv loves coconut chutney as an accompaniment to idlis and dosas. But this chutney now happily finds its way to his plate :) Its extremely easy to make and is really delicious. Here's the recipe.

Ingredients -
1. 2 large tomatoes, washed and cut in large chunks.
2. 0.5 tsp mustard seeds
3. 2 tsp split black gram (dhuli urad daal)
4. 2 tsp daaliya/bhuni chana daal/split roasted gram
5. 2 tsp whole coriander seeds
6. 3-4 curry leaves
7. A pinch of heeng (asafoetida)
8. 2-3 dry red chillies
9. 1 tsp sugar
10. 1 tsp tamarind paste
11. 1 tsp oil
12. Salt to taste

Method -
1. Heat oil in a sauce pan, add mustard seeds and wait for a few seconds.
2. Add ingredients #3 to 8 and saute till the colors change to just a shade darker and the seeds get fragrant.
3. Add chopped tomatoes, tamarind paste, salt, sugar. Mix well and cover.
4. Cook till tomatoes are soft.
5. Turn off the heat and let the mixture cool down.
6. Grind to a fine paste.
7. Serve with idlis/dosas/uttapams.

Check out tomato chutney's picture in this post

Monday, September 10, 2007

Idli Sambhar and Uttapams

I LOVE South Indian food. Only rajma-chawal (kidney beans and rice) come close to my love for masala dosa. I love sambhar, fluffy idlis, crispy vadas, slurpy rasams, the wide variety of rice preparations - lime rice, curd rice, tamarind rice, bisi-bele bhaat, that great variety of chutneys and pickles - just love it all!!

We normally eat south Indian food every two weeks at least. I soak a big batch (too big for the two of us anyways) of rice and daal, make two batches of idlis right away and refrigerate the rest of the batter. Some idlis go in the freezer while some make for lunches. And we have dosas and uttapams for dinner.

Ingredients for basic batter - I realize there are various rice-lentil proportions used to make idlis and dosas. The following makes good idlis and pretty good dosas too, so I just stick to it.
1. 2 Cups rice (parboiled works the best, I mistakenly bought it one time - it made the best idlis ever). But considering that parboiled rice is not available in small packs, I make do with basmati.
2. 1 Cup dhuli urad daal (split black gram).
3. 1 tsp methi (fenugreek) seeds.

Wash and soak the daal and rice (with fenugreek seeds) separately for at least 6 hrs.
Drain water and grind separately. Daal is easier to grind, rice is more of a challenge. Mix well (I mix the batter by hand), cover and let ferment for 10-12 hrs. Fermentation depends on the temperature. This time when I made the batter, it was a towering 102 degrees outside. After letting the batter sit overnight, I kept it in the patio for 2 hrs. When I checked it, the batter had risen all the way to the top! My heart danced, we were going to get fluffy idlis!!

My mom-in-law got me this set of moulds and a stand with a steamer which is one of my favorite things in my kitchen :) . I use non-stick spray to grease the idli moulds. Works very well.

So here's what I do from here - I like to make idlis right away without putting the batter in the fridge. Add a little salt to taste and very gently mix the batter (you don't want to lose all that trapped air). The idli batter should not be thin, a watered down batter will yield flat idlis. While you fill the moulds with idli batter, fill a little water in a steamer/large stock pot and let it come to a boil. You need to make sure that the water will not touch the last idli plate (I just realized I need to take some pics of the moulds and the idli stand to make more sense!)Once water comes to a boil, place the stand in the steamer/stock pot and cover. Keep the flame medium-high. Idlis are normally done in 10-12 minutes. Insert a fork and check if they are done, if it comes out clean you are good to go! Let the idlis cool down for a few minutes before removing them from the moulds.

I let the idlis cool and store one batch in the fridge and one in the freezer. They reheat very well if you sprinkle a few drops of water and partially cover them while microwaving. 30 secs works for me.

100_7096

To make dosas/uttapams from the remaining batter - I remove the batter from the fridge and let it warm up to room temperature.

For uttapams (Parthiv is my dosa/uttapam expert btw :)) - Add chopped onions, tomatoes, green chillies, cilantro and salt to the batter(you can also add chopped cabbage and grated carrots). If it's too thick, add water to bring it to a pourable consistency. Heat a non-stick pan, spread a few drops of oil on it. Spread uttapam batter just like you would do for a pancake/cheela/pooda/pudla. Cover with a lid and let it cook for a minute or two. Add a few more drops of oil on the side up and then flip. Let cook without covering. Keep flipping and roasting till the uttapams are golden and crisp.

Serve with hot sambhar, coconut and tomato chutneys! :) I will post sambhar and chutney (recipe here) recipes soon... do check back! :)

100_7094

Thanks to sweet Asha's suggestion, I am also submitting this recipe for RCI Karnataka (hosted by Asha of Foodie's Hope).

rciK

Saturday, September 8, 2007

Veggie Quesedillas

My husband is a picky eater when it comes to eating veggies. Think about it, a vegetarian, picky about veggies... doesn't add up :D But wrap and roll the veggies in sandwiches, mash them in a bhaji, stuff them in parathas, simmer them in tomatoey gravies, blend them in a soup, hide them in a quesedilla and he won't complain! You get the picture right? So, this recipe of quesedilla works very well for me and he loves it! This recipe is again inspired by Nupur's Wild Mushroom quesedillas :)

Here's what you need:
1. Tortillas
2. Any cheese of your choice, we *always* use hot pepper jack and love it!
3. Veggies like onions, mushrooms, bell peppers (all possible colors :)), zucchini, corn, chopped spinach and anything else that you can think of! I like to use veggies which get tender on a little sauteing and are not watery.
4. Butter
5. Salt and black pepper

Here's what you do:
1. Heat a little butter in a frying pan (wider the better) - add onions, corn and mushrooms, saute for a couple of minutes.
2. Add rest of the veggies and saute till just tender. Add spinach at the end. Add salt and pepper. 3. Place a tortilla on a flat surface, sprinkle some cheese all over. Spread the veggies. You can add pickled jalapeno rings too.
4. Spread another layer of cheese and place another tortilla over. Make sure the tortillas you pick are similar sized.
5. Now heat a flat pan (tava), apply a little butter and place the quesedilla on it. The flame should be medium-slow. Press slightly and flip after a minute or so. Repeat on the other side.
6. Remove from flame and cut into slices.

Here's how you serve: We normally eat quesedillas with fresh salsa, guacamole and light-sour creme (occasionally).

For the salsa: I use the chopper attachment in my hand-blender to prepare salsa. I chop 1 tomato, a little bit of onion, some cilantro, a little lime juice, salt, and 2-3 pickled jalapeno rings (or you can use any kind of fresh green pepper, depending on how hot you want your salsa). Slightly blend all this together to get a chunky salsa.

For the guacamole: Take the flesh of a ripe avocado, mash it or blend it in your blender. Add lime juice while doing this to avoid discoloration. Add a 2 tbsps of finely chopped onions, tomatoes and cilantro. You can also add green pepper and garlic if you prefer. Add salt and guacamole is ready. Very tasty and very healthy!

1333633611_e1c0434cdc

Parthiv loves these quesedillas and I do too! They are quick, colorful, tasty and you can make them quite nutritious with a wise selection of veggies. You can also add any kind of cooked beans to the veggies while sauteing. It makes a good appetizer when serving to a large crowd. They can be made in advance and lightly reheated in the oven before serving. Or if you will have time to roast the tortillas, you can assemble them in advance and roast just before serving.