Sunday, September 30, 2007

Paneer 50-50

Parthiv loves paneer. He makes awesome paneer tikkas and the likes, so when he says he is going to dish out something with paneer, I never think twice and assist him happily :)

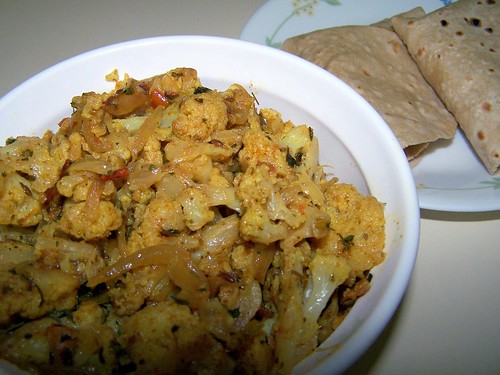
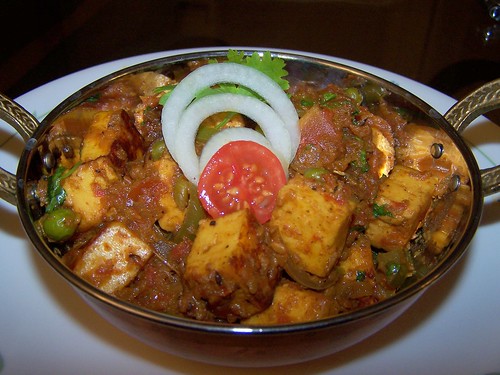
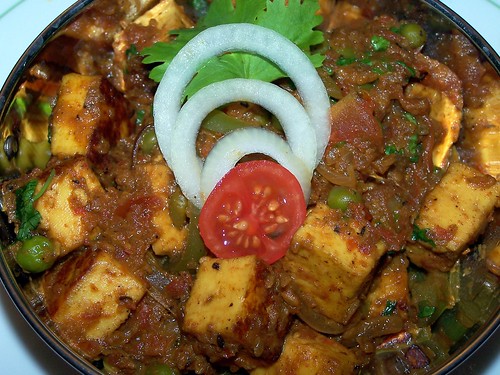
The other day, we wanted to make something easy and simple. I thought of kadhai paneer (a little on the dry side with chopped onions/tomatoes etc). But he was more in the mood for the matar-paneer kind (made with onion/tomato paste). So he declared he'll make me happy and make 50-50 paneer. Here's how he made it.

Ingredients:
1. About 2 cups paneer - thawed to room temperature and cubed. We used frozen paneer bought from an Indian store ("Nanak" brand).
2. 1/2 cup green peas
3. 1 onion (medium-large). Chop half of it it very fine in a chopper and slice the other half lengthwise.
4. 2-3 tomatoes made into a paste (we put the onions and tomatoes in the chopper together, so they were chopped very fine). 1 tomato, sliced lengthwise.
5. 1 tsp grated ginger
3. Half a green bellpepper, sliced thin lengthwise.
4. Red chilli, turmeric, coriander powder and salt to taste.
5. 2 tblsp of milk (use fat free if you like, worked for us).
6. 1.5 tbsp cooking oil.

Method:
1. Heat half the oil in a non-stick pan, as it heats add ginger followed by finely chopped onions and tomatoes. Saute till oil separates, should take 7-10 minutes on medium flame. You may need to add a little more oil to actually see the oil separating :) If you don't want to use too much oil, just ensure that the color gets darker (you may have to keep sprinkling water once in a while to make sure the paste doesn't burn). We added peas also somewhere in between to make sure they get cooked (when to add them will depend on how long it normally takes your peas to cook).
2. In the meanwhile, in a frying pan heat the remaining oil. Add sliced onions and saute, followed by tomatoes and bellpeppers and a little salt. The onions should become translucent but should not cook too much.
3. Add paneer and toss on high flame. Doing this pan-fries the paneer, making it crispier on the outside and eliminating the need for any deep frying.
4. If your tomato/onion paste is done by now, add red chilli, turmeric and coriander powder and salt and saute for a few seconds.
5. Add the sliced-sauteed veggies with paneer to this and mix well, so that the masala coats the paneer.
6. Add half a cup of water and let it simmer for 5 minutes or so, water will almost dry out.
7. When almost done, add milk and let cook for a minute or two.
8. Sprinkle fresh cilantro and serve with hot thick rotis.

100_7201

As easy as that! :) To increase the flavor, you can sprinkle some kasuri methi at the end. Or if you want it spicier you can sprinkle some garam masala.

We turned up cooking our sliced veggies more than we would have liked, but it was delicious anyways :)

100_7198

The leftovers had soaked the gravy completely making it a great candidate for kati rolls (there wasn't much left though!). While packing for lunch, I added some sliced onions and lemon juice to it. At lunchtime, I heated a roti and wrapped warm sabzi in it to make a quick, tasty kati roll!

Saturday, September 29, 2007

Sooji Rotti

Our breakfast during the week is normally cereal or oatmeal (for me occasionally). But during the weekend we like to start the day with a brunch that keeps us going till dinner. I like to keep trying different things as it's so easy to get bored! The two staple Indian breakfast items poha or upma don't show up in my kitchen that often. For the simple fact that hubby dear is not fond of pohe and upma doesn't make me happy! Having grown up in the state of Madhya Pradesh, I have my share of affinity towards pohe for breakfast. I think I can eat it every single day of the week :)

So, back to trying different things - I stumbled across rice rotti on a blog (can't remember which one now!) and tried making it. It came out pretty tasty and I knew I will be making it again. My only complaint - it was not as soft as I would have liked. Very likely due to something I did wrong!

Last Saturday, when I was once again out of ideas for breakfast I turned to my blogroll for help :) And found Rava rotti in Latha's Masala Magic. I had found my Saturday brunch :)!

Here's how I made it -

Ingredients:
1 cup rava/cream of wheat/semolina/sooji
1/2 cup rice flour
1/2 cup chopped onions, grated carrots, chopped cilantro
1 green chilli chopped fine
1 tsp grated ginger
Salt to taste
mustard seeds, heeng, curry leaves, oil to season

Method:
Spread sooji on a plate and microwave for 2 mins. After it cools down, add the rest of the ingredients except the seasoning and mix well. Now you can add enough water to either make a pancake like batter or a loose dough. I have tried both ways and I found the former easier to work with. season with mustard seeds, curry leaves and heeng spluttered in a tsp of hot oil. Mix well.

Heat a non-stick pan and apply a few drops of oil. If using pancake like mix, spread like you would make a pancake. Add a few drops of oil and cover with a lid. After a couple of minutes, flip and cover. Cook for 1 minute and then remove the cover. Roast till crisp and golden.

If you use a loose dough - Make a small ball of the dough and place it on cool tava/pan. Use your fingers to pat the ball till it becomes thin. Follow the same steps hereafter. (Check out pictures on Latha's post)

Serve with butter and pickle/ketchup/tomato chutney/green chutney.

100_7158

Parthiv loved this rotti so much that he said he could have it for breakfast again on Sunday and would love it if I made it for dinner too! He said it's an "addictive" taste and my friends I have to agree!! It was soft on the inside, crisp on the outside and a little touch of butter made it just so awesome. Thanks to Latha and to Supriya of Monsoon Spice (that's where Latha got the inspiration to make this!) :)

Thursday, September 27, 2007

Kasuri Gobhi

I tried this recipe from Bawarchi Contributions once at Parthiv's birthday party and people loved it. Thanks to the contributor Mansi! I make it every once in while just for a change of taste from good 'ol alu-gobhi made Punjabi style or flower-vatana nu shaak made gujarati style.

Ingredients:
1. 1 medium cauliflower cut into medium size florets
2. 2 small potatoes diced (optional)
3. 1 small onion, chopped
4. 1 medium tomato, chopped
5. 1-2 cloves of garlic, minced
6. 2 tsp ginger, grated
7. 1 green chilli, chopped fine
8. 1/2 cup yogurt
9. 1 tsp each of red chilli powder, turmeric powder
10. 2 tsp of coriander powder (or dhana-jeeru)
11. 1 tbsp kasuri methi (dried fenugreek leaves)
12. 1 tbsp oil
13. Salt to taste

Method:
1. Add cauliflower to boiling hot water and let cook till tender (but not completely cooked). Drain to remove water completely. Alternatively, you can cook the cauliflower in a tbsp of oil. Heat oil, add cauliflower, mix, cover and cook on low heat. The second option is tastier, but if you are counting your calorie intake, first option is better.
2. If using potatoes, cook them with a small amount of oil as explained for cauliflower in step 1. 3. While the vegetables are cooking prepare the masala. Heat oil, add ginger, garlic and green chillies.
4. As they get fragrant, add chopped onions and saute till onions are soft and golden.
5. Add chopped tomatoes and saute till tomatoes are soft and cooked well.
6. Add salt, chilli powder, turmeric and coriander powder and mix well.
7. Add yogurt and stir to make sure everything mixes well together. Simmer for 3-4 minutes to make sure yogurt is cooked.
8. Add cauliflower and potatoes, mix well and cover.
9. Sprinkle kasuri methi and mix.
10. Cook for about 5 minutes on high flame without cover.
11. Garnish with fresh cilantro and serve with hot rotis or parathas and tadka daal.

100_7110

You can vary the amount of kasuri methi according to your taste and potency of the leaves. If you prefer the preparation to just have a touch of fragrant methi, reduce qty to half a tbsp.

Tuesday, September 25, 2007

Drunken(?) Chinese(?) Spaghetti and Hot n Sour soup

Like a true Hindustani, I have my share of cravings for 'Indian-Chinese' food. It is amazing how Indianized (read un-Chinese) our Chinese food is :) Well, that's not true... we use soy sauce like the Chinese, we stir-fry like the Chinese... so what if our version is spicier with a kick in each bite and so what if Chinese food in Indore has a distinct taste of Marwari cuisine? :)

So this one day I knew I wanted to eat noodles, the 'Chinese' type! To begin with I didn't have noodles at home. Hubby dear suggested using spaghetti and I made a sorry face. I thought - spaghetti would never fit in, its too fat, its too firm and its too coarse! I then remembered this 'Drunken Spaghetti' I had in a Thai restaurant and thought, lets make it Thai rather than Chinese. I googled for drunken noodles and got back hundreds of recipes. By the way, Wikipedia says the source of the name drunken noodles is unknown.
"No one is sure where the name of this dish comes from. Some believe it is called drunken noodles because it's an excellent hangover cure. Others believe that it is so hot that the eater has to be drunk to be able to stand it, while some are sure that it's because one becomes drunk trying to drown out the heat with alcohol. Still others believe that the name comes from the wide assortment of ingredients the dish contains: The chef is drunk enough to throw in a bunch of vegetables and spices without thinking it over. The most probable explanation is that this is one of the only foods available on the streets of Thailand late at night and in the very early morning, the times when inebriated revelers are leaving places of celebration. It is very possible that the extremely "wobbly" noodles themselves give the dish its name."


All of them called for some ingredient or the other that I did not have. So I gave up on the Thai version and decided - Drunken 'Chinese' spaghetti it will be! Forgive me my Thai and Chinese (and Italian) readers!!

Here's how I made it -

Ingredients
1. Spaghetti - equivalent of 2 cups cooked. I am terrible at measuring it!
2. 2 cups of chopped vegetables - onions, carrots, mushrooms, green bell peppers, spring onions and a little cabbage. And a slit green chilli (serrano/ any fat chilli).
3. 1/2 cup bean sprouts.
4. 2-3 cloves of garlic - minced.
5. 3 tbsp of soy sauce mixed with 1 tbsp of Sambal Oelek or any chilli sauce that you like.
6. Salt to taste, a tsp of black pepper and 1/2 tsp sugar mixed together.
7. 1 tsp white vinegar.
8. 1 tbsp oil to cook.


Method:
1. Boil spaghetti with a little salt. Wash in cold water and drain long enough to get rid of all the water. Toss the spaghetti with a tsp of oil to avoid sticking.
2. Heat 1 tbsp oil in a wok (I use a frying pan that gets really hot, I am still to buy a 'good' wok). As the oil gets hot add minced garlic. Add the soy sauce mix and spread it. Now sprinkle the salt-pepper-sugar mix to cover the bottom of the pan. As it begins to sizzle, add onions, slit chilli and carrots. After 30 secs of sauteing, add mushrooms - 30 secs more and add green bell-peppers and cabbage. I don't like to cook the bell-peppers and cabbage much.
9. Saute everything well and add cooked spaghetti. Toss on high heat till everything comes together.
10. Add spring onions (greens, whites, everything) and vinegar and toss again!

100_7123

For the 'Chinese' Hot n Sour soup -
Ingredients:

1. 1 cup finely chopped cabbage
2. 1/2 cup finely chopped/grated carrots
3. 1 tbsp chopped green bell peppers
4. 2 tbsp tomato ketchup (alternatively puree tomatoes - pressure cook 3 tomatoes with a cup of water, blend and strain to get rid of the seeds and skin.)
5. 1/2 tbsp soy sauce
6. 2 tsp Sriracha chilli sauce or any chilli sauce with a hint of garlic
7. 2 tbsp cornflour/corn starch
8. salt to taste
9. 1 tsp oil

Method:

Heat 1 tsp oil, add all the veggies and about 4 cups of water. If using tomato puree, add it now. If using ketchup, add it later. Add salt and let the soup boil till veggies are cooked. It should take around 10 minutes of boiling. Add soy sauce, chilli sauce and ketchup (you don't need ketchup if you added pureed tomatoes already). Simmer some more. Mix cornflour in 1/4th cup water and mix in the soup, stirring constantly. Add chopped green onions and simmer for a few more minutes. Turn off the heat and stir in 1 tsp of vinegar. Serve hot!

100_7134

We enjoyed my drunken version of Chinese spaghetti with the hot soup and pomegranate-hibiscus iced green-tea. :) I will get to try the Thai recipe as soon as I get all the required ingredients - noodles for a start!

100_7127

Saturday, September 22, 2007

Okra Gojju with Curd rice

I was blessed with two kannadiga room-mates for a while, thats when I understood the subtleties of varieties of rasam and those flavor-explosions called gojjus. So when I read about RCI karnataka, the first thing that came to my mind was gojju!

As students in Texas, we did not get a chance to visit Indian grocery stores very often and thus typical Indian vegetables did not make it to the table much. This one time when we brought some fresh okra, my sweet room-mate Roopa decided to make some bendekay gojju out of it. I loved it! It was a totally new flavor for me and a taste that I would remember forever :) So, when I decided to make okra gojju for Asha's RCI karnataka, I turned to Roopa once again. And she did send me a detailed recipe. Roopa asked me to use the measurements as a guideline and not to follow strictly. I pretty much stuck to the measurements she had given me :) I will copy-paste the recipe here as is-

"Bhindi/pumpkin gojju :
bhindi cut like that for sabji and pumpkin, cut small and long. approx 1lb.
heat up few spoons of oil (more for bhindi), splutter some mustard, add a tablespoon of urad dal and chana dal. fry till golden.
split a couple of green chillies and add (you will add more red chilli kind of spice later, this is mostly for flavor).
add the cut and washed veggie and cook till almost done or till the sticky stuff is gone.
while this is cooking roast 1 table spoon of white sesame seeds in a hot dry pan till they start to splutter. make a dry powder of it afterwards.
now to the cooked veggies add some :
water - lets say half a cup,
sambar/rasam powder -about 1 tablespoon (or gojju powder, but I use this now till my mom gets me more !),
turmeric - a pinch,
salt to taste,
and jaggery - a 1" cube kinda piece (it has to be sweet)
tamarind paste- about one teaspoon (and sour :) )
and add the sesame powder.
and now boil it till it completely cooks ! goes great with rice or chapathis ...best with curd rice ;)"


I closed my eyes and followed her recipe :) I did not have fresh okra so I used the frozen version. I had to add a good amount of oil to make sure the okra didn't turn out sticky. I heated some oil, added mustard and the lentils and added the okra straight out of the freezer without thawing. Thawing makes it real sticky! Rest of the steps were exactly the same. I did not have any home-made rasam/sambar powder, so I used store-bought 'Badshah' sambar masala.

The gojju turned out real tasty. I still think the one that Roopa had made was better! :) Using frozen okra and store -bought sambhar masala could not match the 'real' thing. But nevertheless it was quite close and very very satisfying.

100_7142

I made simple curd rice to go with it. Cannot vouch for the authenticity :)
1. Cook rice and let it cool. Mix some curd, chopped cilantro and salt with the rice. Curd should be enough to make the rice thoroughly wet.
2. Heat a little oil, add mustard seeds, chopped green chillies, heeng and a dry red chilli. Add this to the curd rice and mix well.

100_7140

Okra gojju with curd rice is my entry for RCI Karnataka, hosted by Asha of Foodie's Hope.

rciK

Monday, September 17, 2007

Tomato Chutney

I am very fond of this chutney. Parthiv loves coconut chutney as an accompaniment to idlis and dosas. But this chutney now happily finds its way to his plate :) Its extremely easy to make and is really delicious. Here's the recipe.

Ingredients -
1. 2 large tomatoes, washed and cut in large chunks.
2. 0.5 tsp mustard seeds
3. 2 tsp split black gram (dhuli urad daal)
4. 2 tsp daaliya/bhuni chana daal/split roasted gram
5. 2 tsp whole coriander seeds
6. 3-4 curry leaves
7. A pinch of heeng (asafoetida)
8. 2-3 dry red chillies
9. 1 tsp sugar
10. 1 tsp tamarind paste
11. 1 tsp oil
12. Salt to taste

Method -
1. Heat oil in a sauce pan, add mustard seeds and wait for a few seconds.
2. Add ingredients #3 to 8 and saute till the colors change to just a shade darker and the seeds get fragrant.
3. Add chopped tomatoes, tamarind paste, salt, sugar. Mix well and cover.
4. Cook till tomatoes are soft.
5. Turn off the heat and let the mixture cool down.
6. Grind to a fine paste.
7. Serve with idlis/dosas/uttapams.

Check out tomato chutney's picture in this post

Monday, September 10, 2007

Idli Sambhar and Uttapams

I LOVE South Indian food. Only rajma-chawal (kidney beans and rice) come close to my love for masala dosa. I love sambhar, fluffy idlis, crispy vadas, slurpy rasams, the wide variety of rice preparations - lime rice, curd rice, tamarind rice, bisi-bele bhaat, that great variety of chutneys and pickles - just love it all!!

We normally eat south Indian food every two weeks at least. I soak a big batch (too big for the two of us anyways) of rice and daal, make two batches of idlis right away and refrigerate the rest of the batter. Some idlis go in the freezer while some make for lunches. And we have dosas and uttapams for dinner.

Ingredients for basic batter - I realize there are various rice-lentil proportions used to make idlis and dosas. The following makes good idlis and pretty good dosas too, so I just stick to it.
1. 2 Cups rice (parboiled works the best, I mistakenly bought it one time - it made the best idlis ever). But considering that parboiled rice is not available in small packs, I make do with basmati.
2. 1 Cup dhuli urad daal (split black gram).
3. 1 tsp methi (fenugreek) seeds.

Wash and soak the daal and rice (with fenugreek seeds) separately for at least 6 hrs.
Drain water and grind separately. Daal is easier to grind, rice is more of a challenge. Mix well (I mix the batter by hand), cover and let ferment for 10-12 hrs. Fermentation depends on the temperature. This time when I made the batter, it was a towering 102 degrees outside. After letting the batter sit overnight, I kept it in the patio for 2 hrs. When I checked it, the batter had risen all the way to the top! My heart danced, we were going to get fluffy idlis!!

My mom-in-law got me this set of moulds and a stand with a steamer which is one of my favorite things in my kitchen :) . I use non-stick spray to grease the idli moulds. Works very well.

So here's what I do from here - I like to make idlis right away without putting the batter in the fridge. Add a little salt to taste and very gently mix the batter (you don't want to lose all that trapped air). The idli batter should not be thin, a watered down batter will yield flat idlis. While you fill the moulds with idli batter, fill a little water in a steamer/large stock pot and let it come to a boil. You need to make sure that the water will not touch the last idli plate (I just realized I need to take some pics of the moulds and the idli stand to make more sense!)Once water comes to a boil, place the stand in the steamer/stock pot and cover. Keep the flame medium-high. Idlis are normally done in 10-12 minutes. Insert a fork and check if they are done, if it comes out clean you are good to go! Let the idlis cool down for a few minutes before removing them from the moulds.

I let the idlis cool and store one batch in the fridge and one in the freezer. They reheat very well if you sprinkle a few drops of water and partially cover them while microwaving. 30 secs works for me.

100_7096

To make dosas/uttapams from the remaining batter - I remove the batter from the fridge and let it warm up to room temperature.

For uttapams (Parthiv is my dosa/uttapam expert btw :)) - Add chopped onions, tomatoes, green chillies, cilantro and salt to the batter(you can also add chopped cabbage and grated carrots). If it's too thick, add water to bring it to a pourable consistency. Heat a non-stick pan, spread a few drops of oil on it. Spread uttapam batter just like you would do for a pancake/cheela/pooda/pudla. Cover with a lid and let it cook for a minute or two. Add a few more drops of oil on the side up and then flip. Let cook without covering. Keep flipping and roasting till the uttapams are golden and crisp.

Serve with hot sambhar, coconut and tomato chutneys! :) I will post sambhar and chutney (recipe here) recipes soon... do check back! :)

100_7094

Thanks to sweet Asha's suggestion, I am also submitting this recipe for RCI Karnataka (hosted by Asha of Foodie's Hope).

rciK

Saturday, September 8, 2007

Veggie Quesedillas

My husband is a picky eater when it comes to eating veggies. Think about it, a vegetarian, picky about veggies... doesn't add up :D But wrap and roll the veggies in sandwiches, mash them in a bhaji, stuff them in parathas, simmer them in tomatoey gravies, blend them in a soup, hide them in a quesedilla and he won't complain! You get the picture right? So, this recipe of quesedilla works very well for me and he loves it! This recipe is again inspired by Nupur's Wild Mushroom quesedillas :)

Here's what you need:
1. Tortillas
2. Any cheese of your choice, we *always* use hot pepper jack and love it!
3. Veggies like onions, mushrooms, bell peppers (all possible colors :)), zucchini, corn, chopped spinach and anything else that you can think of! I like to use veggies which get tender on a little sauteing and are not watery.
4. Butter
5. Salt and black pepper

Here's what you do:
1. Heat a little butter in a frying pan (wider the better) - add onions, corn and mushrooms, saute for a couple of minutes.
2. Add rest of the veggies and saute till just tender. Add spinach at the end. Add salt and pepper. 3. Place a tortilla on a flat surface, sprinkle some cheese all over. Spread the veggies. You can add pickled jalapeno rings too.
4. Spread another layer of cheese and place another tortilla over. Make sure the tortillas you pick are similar sized.
5. Now heat a flat pan (tava), apply a little butter and place the quesedilla on it. The flame should be medium-slow. Press slightly and flip after a minute or so. Repeat on the other side.
6. Remove from flame and cut into slices.

Here's how you serve: We normally eat quesedillas with fresh salsa, guacamole and light-sour creme (occasionally).

For the salsa: I use the chopper attachment in my hand-blender to prepare salsa. I chop 1 tomato, a little bit of onion, some cilantro, a little lime juice, salt, and 2-3 pickled jalapeno rings (or you can use any kind of fresh green pepper, depending on how hot you want your salsa). Slightly blend all this together to get a chunky salsa.

For the guacamole: Take the flesh of a ripe avocado, mash it or blend it in your blender. Add lime juice while doing this to avoid discoloration. Add a 2 tbsps of finely chopped onions, tomatoes and cilantro. You can also add green pepper and garlic if you prefer. Add salt and guacamole is ready. Very tasty and very healthy!

1333633611_e1c0434cdc

Parthiv loves these quesedillas and I do too! They are quick, colorful, tasty and you can make them quite nutritious with a wise selection of veggies. You can also add any kind of cooked beans to the veggies while sauteing. It makes a good appetizer when serving to a large crowd. They can be made in advance and lightly reheated in the oven before serving. Or if you will have time to roast the tortillas, you can assemble them in advance and roast just before serving.

Wednesday, September 5, 2007

Tortilla Soup

This tortilla soup I that have been making for quite some time now is inspired by this great recipe on Nupur's OneHot Stove. Every time I make tortilla soup, I twist the recipe some way or another. We have had it totally blended, partially blended and last night - un-blended. Here's how I made it last night.

Ingredients:
1 Cup frozen corn
0.5 Cup chopped tomatoes
0.5 Cup chopped onions
1 pepper (Anaheim/Serrano/Jalapeno/Habanero depending on how much heat you can take!)
1 tsp cumin powder
1 tsp any red chili powder
Salt to taste
Some cilantro (with stalks)
2 tsp lime juice
A handful (or more) of tortilla chips (Chili-lime flavored chips from Trader Joe's work just great!)
1 cup mixed veggies (optional) - I used green bell pepper and zucchini last night (was just trying to clear my fridge). I don't think I would like to use any vegetable that has an overpowering flavor. Zucchini and bell pepper blended well in the soup. I have used tomatillos once, the soup turned out tangy but really delicious.
2 tsp olive oil

Method:
1. Heat olive oil. Add onions, corn and pepper. Saute for a few minutes.
2. Add tomatoes, zucchini, bell pepper and saute again. Add red chili, cumin powders and salt.
3. I remove the green pepper at this point as we like soups mild. You can keep it till the simmering stage if you prefer.
4. Add about 4 cups of water and let the soup simmer for 15-20 minutes. Alternatively, use a pressure cooker (about 3 whistles). If you use the latter option your soup will come out very watery but the corn will be cooked well. You will still have to simmer for 10 mins or so.
5. When almost done, add a handful of crushed tortilla chips. Simmer and simmer till the chips dissolve too. Somewhere in this time frame add the cilantro (I didn't remove the stalks as I wanted just the flavor, not the leaves in my soup).
6. Blend the soup if you prefer.
7. Add lime juice and more tortilla chips/strips (we skipped the latter - just a calorie cutting measure, they taste wonderful though!).

ts

I love this soup! Its fills you with a sense of warm satisfaction :) It makes a meal in itself, but when making it for dinner, quesedillas almost always follow the soup. Recipe for quesedillas follows in the next post.

Monday, September 3, 2007

Food for the soul - Khichdi

I have not always loved khichdi. In fact, when I was younger khichdi always made me think of being sick. What my little head didn't know at that time was that khichdi is the epitome of comfort food, something that would bring relief to your sick tummy and your depressed soul :) So, slowly and steadily I learnt to love it. My relationship with khichdi once again turned sour when I moved to a hostel for my bachelors. The lady who ran our mess thought of khichdi as a means to use up her (probably) several days old leftovers, and that didn't go too well with my palette. She thought we'd never know if everything was mashed well enough! I sometimes wish it worked that way :)

Well, I didn't stay in the hostel too long and slowly and steadily we were friends again. After meeting Parthiv I was quite happy to find that we shared our love for khichdi. I was used to eating yellow moong daal khichdi with ghee/dahi/raita and Parthiv loved green moong khichdi with gujarati kadhi. So I moved on to green khichdi, but I would still continue to eat it with dahi and make kadhi for Parthiv. And then the new love affair began, I discovered khichdi and kadhi were meant to go hand in hand and happily embraced the combination.
We were visiting my friend R for her baby shower on Saturday. Since dinner was going to be quite elaborate, her mom made a simple sabudana ki khichdi lunch for us. She asked us if were interested in tasting some masala khichdi she had made the day before. I had a spoonful of it and my love for yellow khichdi flared again :) So, I decided to make it for lunch on sunday. One thing that was different in the gujarati style khichdi was the use of mustard for tempering. So I kind of tried to reproduce the amazing taste. Here's the recipe (serves 2)-

Ingredients:
0.5 cup rice (I used basmati)
0.5 cup yellow moong daal - wash and soak for about 15-20 mins.
2 - 2.5 cups water
1.5 tsp mustard seeds
2 cloves
a pinch of heeng (asafoetida)
1 tsp dhana-jeera (coriander-cumin) powder
1 tsp turmeric
2 tsp red chilli powder
1.5 - 2 tsp or so of garam masala (preferably non-punjabi style. I think 'MDH' garam masala fits the bill for punjabi garam masala. For my gujarati preparations, I prefer using 'Mother's recipe' brand of garam masala)
salt to taste
1 tblsp ghee/oil (preferably ghee)
1 medium tomato -chopped
A handful of chopped cilantro to garnish

Method:
1. Wash and soak moong daal for 15-20 mins.
2. Wash rice.
3. Heat ghee in a pressure cooker. Add mustard seeds and cloves.
4. As they begin to splutter, add heeng and the rest of the dry spices. Tip: measure and mix your spices before-hand.
5. Quickly add chopped tomato. Be very careful in steps 4 and 5. You have to be quick or the spices will burn.
6. Saute for half a minute or so and add daal-rice mixture. Mix well and add 2.5 cups of water. If you want your grains to be separate, add only 2 cups of water.
7. Add salt, mix and pressure cook for 3-4 whistles. 3 whistles for separate grains.
8. Let the pressure cooker cool down. If you feel the khichdi is not cooked yet, add a little more water and cook some more.
9. Add cilantro and mix.

To serve:
We had khichdi topped with a tsp of ghee, with yoghurt, store bought ginger relish/pickle and roasted papads on the side. Parthiv hates pickles so he had his khichdi with just papad.

100_7072

For healthy variations, you can add peas, carrots, green beans etc. I was tempted to add some sprouted moong but did not want to play around with the taste I was trying to recreate. I wanted my khichdi on the spicy note. You can vary the quantity of spice to suit your taste.

100_7069